It can be applied across customer service, e-commerce, and more.
Reduces response time and increases availability.
Offers personalized user experiences based on conversation context.
NLP and Its Importance in Chatbots
Natural Language Processing (NLP) is a pivotal branch of artificial intelligence that focuses on the interaction between computers and humans using the natural language.
The goal of NLP is to read, decipher, understand, and make sense of human languages in a valuable manner. It encompasses various components such as:
Syntax: The arrangement of words in a sentence to make grammatical sense.
Semantics: The interpretation of the meaning behind the words.
Dialogue Management: The system’s ability to manage a conversation flow with the user.
NLP plays a crucial role in chatbots by enabling them to understand user intent and the context of queries.
This understanding is foundational for generating relevant and accurate responses. The benefits of integrating NLP in chatbots include:
Enhanced accuracy in recognizing and responding to user queries.
Improved user experience through more natural and fluid conversations.
The ability to handle a wider range of queries by understanding variations in language use.
Key NLP Technologies for Chatbots
Several NLP technologies are particularly relevant to enhancing chatbot performance, including:
Sentiment Analysis: This technology helps chatbots understand the emotional tone behind user messages, enabling them to respond more empathetically.
Entity Recognition: This process identifies specific entities within the text, such as names, locations, and dates, allowing for more precise responses.
Machine Translation: Enables chatbots to translate user input from one language to another, making them accessible to a wider audience.
Each of these technologies contributes to chatbots’ sophistication, enhancing their ability to engage users effectively.
For example, sentiment analysis can tailor responses to the user’s mood, while entity recognition ensures the chatbot grasps the specifics of a request, such as time or place.
Latest Advancements in NLP Technologies shaping the future of chatbots include:
Improvements in contextual understanding, enabling chatbots to remember and reference earlier parts of the conversation for more coherent interactions.
The development of predictive text generation allows chatbots to anticipate user needs and offer information proactively.
Advances in multilingual support, expanding the global accessibility of chatbots by enabling them to understand and communicate in multiple languages more effectively.
These advancements in NLP technologies are continually pushing the boundaries of what chatbots can do, making them an increasingly valuable tool in digital communication and customer service platforms.
Steps to Implement NLP in Chatbots
Implementing NLP in chatbots involves several crucial steps, each contributing to the chatbot’s ability to understand and process human language effectively.
Here’s how to go about it:
Preparing Data for NLP
Collection: Gather a wide range of text data your chatbot will likely encounter. This includes questions, statements, and commands in various formats and styles.
Cleaning: Remove irrelevant information, such as non-textual content or extraneous symbols, to ensure the data is clean and concise.
Preprocessing: Apply tokenization, stemming, and lemmatization to simplify and prepare the text for analysis.
Training the Chatbot
NLP Models: Select appropriate NLP models that align with your chatbot’s objectives. This could range from simple rule-based models for structured tasks to complex neural networks for more nuanced understanding.
Techniques: Employ machine learning techniques to teach your chatbot. This involves feeding the cleaned and preprocessed data into the NLP model and training it to recognize patterns, intents, and entities.
Integration of NLP Models into Chatbot Frameworks
Once the model is trained, integrate it into your chatbot’s framework. This allows the chatbot to utilize the NLP model’s capabilities in real-time user interactions.
Continuous Learning and Adaptation
Feedback Loop: Implement a mechanism for your chatbot to learn from interactions. This can be achieved through regular updates to the NLP model with new data collected from ongoing conversations.
Adaptation: Allow for the adjustment of responses based on user feedback and changing language use, ensuring that the chatbot remains relevant and effective over time.
Pros and Cons of Implementing NLP in Chatbots
Implementing Natural Language Processing (NLP) in chatbots significantly enhances their ability to understand and interact with users.
However, like any technology, it comes with its advantages and challenges. Here’s an overview:
Pros
Improved Understanding: NLP enables chatbots to understand human language nuances, making interactions more natural and effective.
Enhanced User Experience: With NLP, chatbots can provide relevant and contextually appropriate responses, significantly improving the user experience.
Broadened Accessibility: The ability to process and understand multiple languages and dialects makes NLP-powered chatbots accessible to a wider audience.
Efficiency in Handling Queries: NLP allows chatbots to handle various queries simultaneously, reducing wait times and increasing overall efficiency.
Personalization: Through understanding user preferences and behaviors, NLP enables chatbots to offer personalized recommendations and services.
Continuous Learning: NLP models can learn from interactions, meaning chatbots continually improve their responses.
Cons
Complexity in Implementation: Developing and integrating NLP into chatbots requires significant technical expertise and resources.
Language and Cultural Barriers: Despite advancements, NLP may struggle with certain languages and dialects and understanding cultural nuances.
Maintenance and Updating: Keeping the NLP model accurate and relevant requires continuous data collection, analysis, and model retraining.
Potential for Misinterpretation: NLP is not infallible and can misinterpret user intent or sentiment, leading to incorrect responses.
Privacy Concerns: Processing sensitive user data through chatbots raises privacy and security issues that must be meticulously managed.
Cost: The initial setup, maintenance, and ongoing development of NLP-powered chatbots can be costly, especially for small businesses.
Implementing NLP in chatbots represents a balance between harnessing advanced technology to improve user interaction and managing the complexities and costs associated with its integration.
As NLP technology continues to evolve, many of the current challenges will likely diminish, further increasing the value and capabilities of NLP-powered chatbots.
Challenges and Solutions in NLP Implementation
Implementing NLP in chatbots is not without its challenges. However, with strategic approaches, these challenges can be navigated successfully.
Common Challenges
Language Diversity: The vast array of languages, dialects, and colloquialisms can make it difficult for NLP models to accurately understand every user.
Understanding Context: Chatbots may struggle to grasp the context of a conversation, leading to accurate responses that are not contextually appropriate.
Strategies and Solutions
Diverse Training Data: Ensure the training dataset is diverse and representative of the different languages and dialects your chatbot may encounter.
Contextual Awareness: To improve response relevance, implement models considering the context of the entire conversation, not just the last message.
Continuous Improvement: Regularly update the NLP model with new data and user feedback to enhance understanding and accuracy.
Case Studies of Successful NLP Implementations
Customer Service Chatbot: A major e-commerce company implemented an NLP-driven chatbot that reduced customer service response times by efficiently understanding and categorizing user queries.
Healthcare Assistant: A healthcare provider used an NLP chatbot to triage patient inquiries, successfully understanding and responding to various health-related questions based on patient symptoms.
These steps and strategies highlight the pathway to successfully implementing NLP in chatbots, overcoming common challenges, and leveraging real-world examples to achieve effective and engaging chatbot interactions.
The Future of NLP in Chatbots
The landscape of NLP within chatbots is poised for transformative change, driven by technological advancements and a deeper understanding of human language nuances.
Here’s what the future may hold:
Emerging Trends in NLP and Their Impact on Chatbot Development
Contextual Understanding: Future NLP systems will offer more sophisticated contextual comprehension, enabling chatbots to carry on more coherent and contextually relevant conversations.
Emotion Recognition: Advancements in sentiment analysis will allow chatbots to detect and respond to users’ emotional states, further personalizing interactions.
Multilingual Capabilities: Enhanced language models will empower chatbots to seamlessly interact in multiple languages, breaking down communication barriers across the globe.
The Role of AI and Machine Learning in Advancing NLP Capabilities for Chatbots
AI and machine learning are the engines driving NLP forward, with innovations such as transformer models and deep learning techniques paving the way for more intuitive and human-like chatbot interactions.
Predictions for the Future of Chatbot Interactions Powered by NLP
Personal Assistants: Chatbots could evolve into personal assistants, capable of managing more complex tasks with ease, understanding individual user preferences, and delivering personalized experiences.
Seamless Integration: Future chatbots will be more deeply integrated into our digital lives, offering seamless interaction across various platforms and devices.
Proactive Engagement: With better predictive capabilities, chatbots will respond to queries, anticipate user needs, and initiate conversations.
FAQs
What is NLP in chatbots?
NLP (Natural Language Processing) allows chatbots to understand and interpret human language, enabling them to respond in a way that mimics human conversation.
How does NLP improve chatbot responses?
By analyzing the user’s language, NLP improves the chatbot’s ability to accurately respond to a wide range of queries.
Can NLP make chatbot conversations feel more natural?
Yes, NLP facilitates natural, conversational interactions, making chatbots seem more like talking to a human than a machine.
Do chatbots learn from interactions?
Chatbots utilize machine learning, a component of NLP, to learn and improve from each interaction, enhancing their performance over time.
Where are NLP chatbots commonly used?
They are widely used in customer service, e-commerce, booking services, and many other areas where automated assistance is beneficial.
How does NLP affect chatbot response time?
NLP technology helps reduce response time by quickly interpreting queries and generating appropriate responses, increasing overall efficiency.
Can NLP chatbots provide personalized experiences?
They can offer personalized user experiences by analyzing conversation context and adapting responses accordingly.
Are NLP chatbots difficult to implement?
While implementing NLP in chatbots requires technical expertise, numerous platforms and tools are available to simplify the process.
Can any business benefit from an NLP chatbot?
NLP chatbots can benefit businesses of all sizes and industries, especially those looking to improve customer engagement and support.
How does NLP handle different languages or dialects?
Advanced NLP systems can understand multiple languages and dialects, though effectiveness can vary depending on the specific technology used.
Do NLP chatbots require constant updates?
NLP chatbots may need updates and training to maintain accuracy and effectiveness, especially as language use and business needs evolve.
Can NLP chatbots understand complex queries?
NLP chatbots can increasingly understand complex queries, but their ability to respond accurately can depend on their design and training.
What is the future of NLP in chatbots?
The future points towards even more sophisticated NLP integration, enabling chatbots to handle more complex interactions and offer personalized services.
How do privacy concerns affect NLP chatbots?
Privacy and data protection are crucial, requiring transparent policies on data use and ensuring compliance with relevant regulations.
Are there limitations to what NLP chatbots can do?
While NLP greatly expands chatbot capabilities, limitations exist in understanding nuances, emotions, and highly complex queries.
Conclusion
The integration of NLP has been pivotal in transforming chatbots from simple scripted agents to sophisticated conversational entities. This evolution has brought significant benefits for both businesses and users, including:
Improved User Experience: NLP-powered chatbots provide a more natural and engaging interaction, closely mimicking human conversation.
Enhanced Efficiency: Businesses benefit from the automation of customer service tasks, leading to faster response times and higher satisfaction levels.
Insightful Data Analysis: The ability of chatbots to analyze and interpret user data opens up new avenues for personalized marketing and customer insight.
As we look to the future, it’s clear that the synergy between chatbot technology and NLP will continue to evolve, offering even more advanced and intuitive ways for humans to interact with machines. The continuous advancements in AI and machine learning promise to further refine and expand the capabilities of NLP-powered chatbots, making them an indispensable tool in our digital ecosystem.
NLP tools automate the analysis of text for patterns and sentiments.
They include features for text mining, sentiment analysis, and language interpretation.
Key tools offer scalability, accuracy, and integration with various platforms.
Used widely in marketing, finance, healthcare, and research.
They address challenges like linguistic nuances and privacy concerns.
Future trends point towards advanced AI integration and real-time analysis capabilities.
NLP, Text Mining, and Sentiment Analysis
Natural Language Processing (NLP) is a branch of artificial intelligence that focuses on interacting with computers and humans through natural language.
The goal is to read, decipher, understand, and make sense of human languages in a valuable way. NLP is crucial for text analysis, enabling machines to process and analyze large amounts of natural language data.
Text Mining involves extracting interesting and non-trivial patterns or knowledge from unstructured text data. It employs a variety of methodologies and techniques from NLP and data mining to accomplish tasks such as:
Summarization
Classification
Clustering
Sentiment Analysis is a key application of NLP. It focuses on identifying and categorizing opinions expressed in a text. It aims to determine the writer’s attitude towards particular topics or the overall contextual polarity of the document.
Sentiment analysis helps in the following:
Understanding customer opinions
Monitoring brand reputation
Gathering insights from social media
Key Features of Effective NLP Tools
Effective NLP tools are distinguished by several critical features that enhance their utility and effectiveness in processing and analyzing text data.
These features include:
Automation of Text Analysis Tasks: These tools automate the extraction of meaningful information from text, enabling efficient analysis of large datasets without manual intervention.
Accuracy in Interpreting Nuances of Human Language: High-quality NLP tools are adept at understanding the complexities and nuances of language, including slang, idioms, and varying syntax, which are essential for accurate analysis.
Scalability to Handle Large Volumes of Text: Scalability ensures that NLP tools can process and analyze data sets of any size, catering to the needs of both small projects and big data applications.
Integration Capabilities with Other Software and Platforms: To maximize their utility, NLP tools often integrate various databases, analytics platforms, and software ecosystems, allowing for a seamless workflow in data analysis projects.
By focusing on these key features, NLP tools unlock the potential to transform raw text into actionable insights, driving informed decision-making across various domains.
Top 10 NLP Tools for Text Mining and Sentiment Analysis
In today’s data-driven world, the power of Natural Language Processing (NLP) is indispensable for gleaning insights from unstructured text data.
From analyzing customer feedback to monitoring social media sentiment, NLP tools have become vital for businesses across sectors.
We present an in-depth look at the top 10 NLP tools designed for text mining and sentiment analysis, ensuring your business stays ahead of the curve by leveraging the most advanced technologies available.
1. Monkey Learn
Monkey Learn stands out with its user-friendly interface, making NLP accessible even to those without a background in data science. It specializes in text classification, sentiment analysis, and extracting actionable insights from text data.
Key Features:
Pre-trained models for quick deployment
Custom model capabilities for tailored insights
Seamless integration with popular business tools
Industry Application: Marketing, customer support, and product feedback analysis.
2. Aylien
Aylien leverages advanced AI to offer deep insights from news content, making it ideal for media monitoring and market research.
Key Features:
Comprehensive news API for real-time monitoring
Text analysis capabilities, including sentiment analysis and entity recognition
Multilingual support for global coverage
Industry Application: Public relations, finance, and market research.
3. IBM Watson
IBM Watson is renowned for its robust AI and machine learning features, providing businesses with a wide range of NLP services.
Key Features:
Advanced sentiment analysis
Natural language understanding for deeper insights
Extensive document analysis capabilities
Industry Application: Healthcare, finance, and customer service.
4. Google Cloud NLP
Google Cloud NLP harnesses Google’s machine-learning expertise to offer powerful text analysis capabilities.
Key Features:
State-of-the-art sentiment analysis
Entity recognition and content classification
Integration with Google Cloud services
Industry Application: Content management, marketing analysis, and e-commerce.
5. Amazon Comprehend
Amazon Comprehend provides a seamless way to integrate complex NLP tasks into applications powered by AWS’s robust infrastructure.
Key Features:
Real-time and batch text processing
Keyphrase extraction and sentiment analysis
Medical information analysis with a specialized version
Industry Application: Healthcare, customer feedback analysis, and compliance monitoring.
6. NLTK (Natural Language Toolkit)
NLTK is a popular open-source library in Python, offering a wide range of tools and resources for building NLP applications.
Key Features:
Comprehensive library for text processing
Support for classification, tokenization, stemming, and tagging
Active community and extensive documentation
Industry Application: Education, research, and development projects.
7. SpaCy
SpaCy is a modern, fast NLP library for Python known for efficiently handling large volumes of text.
Key Features:
High-speed processing and accuracy
Pre-trained models for multiple languages
Easy model customization and extension
Industry Application: Content extraction, language understanding, and product categorization.
8. Stanford Core NLP
Developed by Stanford University, Stanford Core NLP is a toolkit offering a range of grammatical analysis tools.
Key Features:
Robust tools for linguistic analysis
Integration capabilities with various programming languages
Support for multiple languages
Industry Application: Academic research, text analytics, and data extraction.
9. Text Blob
Text Blob simplifies text processing in Python, providing an intuitive API for common NLP tasks.
Key Features:
Easy to use for beginners
Sentiment analysis, POS tagging, and noun phrase extraction
Extensions for language translation and spelling correction
Industry Application: Educational projects, prototype development, and sentiment analysis.
10. Gensim
Gensim is renowned for its ability to handle large text corpora, offering efficient algorithms for topic modeling and document similarity.
Key Features:
Scalable to large datasets
Efficient implementations of market-leading algorithms
Focus on unsupervised topic modeling and document similarity
Industry Application: Document management, recommendation systems, and market research.
Leveraging these NLP tools can transform your business’s approach to data analysis, offering nuanced insights that drive decision-making and strategic planning.
Whether you’re analyzing customer sentiment, researching market trends, or developing intelligent systems, these tools can extract meaningful information from complex text data.
Criteria for Selecting NLP Tools
Selecting the right NLP tools for your business or project involves more than picking the most popular option.
It requires a thoughtful consideration of various factors that will impact the effectiveness, integration, and overall success of the NLP application in your workflows.
Below, we detail the key criteria to guide your selection process, ensuring you choose tools that align with your specific needs and objectives.
Accuracy and Reliability
What to Look For: Tools should deliver high precision and recall rates in their analyses. Look for evidence of rigorous testing, validation against real-world datasets, and peer reviews or case studies demonstrating successful applications.
Why It Matters: The foundation of any data-driven decision-making is the quality of insights derived. Accuracy ensures that the patterns, trends, and predictions you base your decisions on reflect the true nature of the data.
User Interface and Ease of Use
What to Look For: An intuitive, user-friendly interface that allows technical and non-technical users to operate the tool efficiently. Ease of use is crucial for teams to adopt and fully leverage the capabilities of NLP tools.
Why It Matters: A steep learning curve can hinder adoption and reduce the potential benefits of the tool. Ease of use ensures broader acceptance and more effective, widespread application across your organization.
Support for Multiple Languages
What to Look For: The ability to analyze and interpret data in various languages can be critical, especially for global businesses. Check for support for the languages relevant to your audience or data sources.
Why It Matters: Multilingual support expands the tool’s applicability across different geographical markets and datasets, enabling a more comprehensive understanding of global customer sentiment and behaviors.
Cost and Licensing Options
What to Look For: Understand the pricing structure, including tiered subscription plans, one-time fees, or usage-based pricing. Review the licensing agreement for any restrictions or obligations impacting your tool use.
Why It Matters: Budget considerations, such as the flexibility to scale usage up or down based on needs, are paramount. A clear understanding of costs and licensing terms helps in planning and avoids unexpected expenses.
By carefully considering these criteria, you can ensure that the NLP tools you select meet your immediate needs and offer the potential to scale and adapt as your requirements evolve.
The right tools will provide actionable insights, enhance operational efficiency, and contribute to more informed decision-making processes across your organization.
Real-Life Use Cases of NLP Tools in Marketing and Social Media
The fusion of Natural Language Processing (NLP) tools with marketing and social media strategies has revolutionized how brands interact with their audience, manage their reputation, and harness customer feedback.
Below, we explore this synergy through real-life examples, highlighting the use cases, industries that have benefited, and the specific tools or technologies leveraged to achieve these outcomes.
Tracking Brand Sentiment and Customer Feedback
Use Case: Companies increasingly use NLP tools to monitor and analyze customer sentiment across various social media platforms and feedback channels. This approach enables businesses to understand public perception of their brand, products, or services in real time.
Industry: This application is widespread but particularly significant in the retail, entertainment, and service industries, where customer sentiment can quickly influence brand reputation and consumer decisions.
Benefits:
Immediate Insight into Customer Sentiment: Brands can gauge public reaction to new product launches, marketing campaigns, or company news, allowing for rapid response to customer concerns or market trends.
Enhanced Customer Experience: By understanding customer feedback and sentiment, companies can tailor their products, services, and communication strategies to better meet the needs and preferences of their target audience.
Proactive Reputation Management: Monitoring brand sentiment helps companies address negative feedback swiftly, mitigating potential damage to their reputation.
Tools and Technology:
MonkeyLearn: Utilized for its sentiment analysis capabilities, MonkeyLearn allows brands to automatically classify text as positive, negative, or neutral, making it easier to track overall brand sentiment.
Brandwatch: A comprehensive tool for social media monitoring, Brandwatch provides deep insights into brand mentions, sentiment trends, and the impact of social media campaigns.
Hootsuite Insights: Powered by Brandwatch, this tool offers real-time monitoring of social media conversations, enabling brands to monitor what’s being said about them across various platforms.
Each tool employs advanced NLP algorithms to sift through the vast amount of unstructured data on social media and other digital platforms, transforming it into actionable insights.
By leveraging these technologies, companies can stay ahead in the fast-paced digital marketing landscape, ensuring their strategies resonate well with their audience and their brand reputation remains strong.
This use case exemplifies the power of NLP in extracting valuable insights from natural language, showcasing its critical role in modern marketing strategies and customer relationship management.
As NLP technologies evolve, we expect even more innovative applications to emerge, further transforming the marketing and social media domains.
Real-Life Use of NLP Tools in Finance: Analyzing Market Sentiment for Investment Strategies
Use Case Overview
Accurate gauging of market sentiment is crucial for developing effective investment strategies in finance.
Market sentiment refers to the overall attitude of investors toward a particular security or financial market. I
It’s an aggregate of multiple factors, including news articles, expert opinions, social media discussions, and financial reports, which can influence investment decisions and market movements.
Industry Application
This application is widely used in the finance sector, encompassing investment firms, hedge funds, and individual traders.
Financial analysts can predict market trends by analyzing market sentiment, identifying investment opportunities, and mitigating risks.
Benefits
Enhanced Decision-Making: Real-time sentiment analysis gives investors a nuanced understanding of the market, enabling them to make informed decisions.
Risk Mitigation: Understanding the emotional tone behind market movements helps anticipate volatility, allowing for strategies that minimize potential losses.
Competitive Advantage: Access to sophisticated sentiment analysis tools gives investors an edge over those relying solely on traditional financial indicators.
Tools and Technology Used
Text Analytics Platforms: Tools like Aylien and IBM Watson are adept at extracting sentiment from financial news and reports, employing deep learning to understand the nuances of finance language.
Social Media Monitoring Tools: Platforms such as Brandwatch and Awario delve into social media conversations, forums, and blogs to capture the public’s mood regarding market conditions, specific stocks, or the economy in general.
Algorithmic Trading Software: Integrating NLP tools with algorithmic trading systems allows for the automation of trading strategies based on sentiment indicators. Tools like Gensim and NLTK can be customized to analyze large datasets from financial documents and provide inputs for these trading algorithms.
Market Research Tools: Specialized NLP applications in market research tools can analyze sentiment trends over time, providing historical context to current market sentiments, which is crucial for long-term investment planning.
In conclusion, NLP tools transform finance by enabling more nuanced and dynamic investment strategies.
By leveraging the power of language processing and sentiment analysis, investors can navigate the market’s complexities with greater insight and precision.
As NLP technology continues to evolve, its integration into financial analysis and strategy development is expected to deepen, further enhancing the capabilities of financial professionals and the performance of investment portfolios.
Real-Life Use of NLP Tools in Healthcare: Extracting Patient Information from Clinical Notes for Better Care Management
Use Case Overview
In the healthcare sector, the efficient management and analysis of clinical notes—ranging from doctors’ observations to patient histories and treatment plans—are critical for delivering high-quality care.
NLP tools are revolutionizing the handling of this data by extracting relevant patient information from unstructured clinical notes.
This process facilitates a more nuanced understanding of a patient’s health status, contributing to personalized and timely care.
Industry Application
This application is crucial across various healthcare settings, including hospitals, clinics, and research institutions.
Healthcare professionals and medical researchers leverage NLP tools to process vast amounts of textual data quickly, which would otherwise be time-consuming and prone to human error if done manually.
Benefits
Improved Patient Care: By efficiently analyzing clinical notes, healthcare providers can make more informed decisions, leading to better patient outcomes.
Enhanced Data Management: Automating patient information extraction helps organize electronic health records (EHRs) more effectively, making data retrieval faster and more reliable.
Facilitated Research and Development: Researchers can use extracted data to identify trends, evaluate treatment outcomes, and contribute to medical research, leading to advances in healthcare.
Tools and Technology Used
Amazon Comprehend Medical: This NLP service extracts relevant medical information from unstructured text, including conditions, medications, and treatment outcomes. It’s specifically tailored for healthcare applications and ensures compliance with data privacy standards.
IBM Watson Health: Utilizes advanced NLP capabilities to analyze medical literature and patient data. It supports healthcare professionals by providing insights into patient care, research, and population health management.
Stanford NLP Group’s Clinical Text Analysis: Developed by the Stanford NLP Group, this toolkit is designed for processing and understanding medical texts. It includes models trained on clinical notes and identifying medical entities and relationships.
Google Cloud Healthcare API: Integrates NLP with other Google Cloud services to extract insights from EHRs. It facilitates clinical text analysis for insights into diagnoses, treatments, and patient sentiment.
By integrating NLP tools into healthcare processes, the industry can leverage the rich information in clinical notes, leading to improved care management, operational efficiencies, and the acceleration of medical research.
As these technologies continue to evolve, their impact on patient care and the healthcare system is expected to grow, marking a significant advancement in how medical information is utilized for the benefit of patients and providers alike.
Real-Life Use of NLP Tools in Research and Academia: Facilitating Literature Review and Research Analysis
Use Case Overview
The academic and research sectors are inundated with vast data from published papers, articles, and journals.
NLP tools are pivotal in managing this deluge, enabling scholars and researchers to conduct comprehensive literature reviews and analyses efficiently.
NLP facilitates deeper insights and discoveries by automating the extraction and synthesis of information from extensive textual datasets.
Industry Application
This application spans all academic disciplines, from the sciences and engineering to the humanities and social sciences.
Researchers, academics, and students leverage NLP tools to streamline the literature review process, identify research gaps, and analyze textual data for various studies.
Benefits
Efficient Data Processing: NLP tools significantly reduce the time required to review literature, allowing researchers to process and analyze documents at an unprecedented scale.
Enhanced Insight Discovery: Automated analysis helps uncover patterns, trends, and connections that might not be immediately apparent, leading to novel insights and hypotheses.
Improved Research Productivity: By automating the labor-intensive parts of the literature review and analysis, researchers can focus more on hypothesis formation, experiment design, and writing.
Tools and Technology Used
Gensim: Popular for its topic modeling capabilities, Gensim is used in academia to discover the underlying themes in large collections of documents, making it easier to categorize and summarize research findings.
Mendeley: While primarily a reference manager, Mendeley uses NLP to help researchers organize their literature, discover new research, and collaborate online with others in their field.
NVivo: Offers powerful text analysis features, enabling researchers to code and extract insights from qualitative data. Its NLP capabilities facilitate thematic analysis and sentiment analysis in large datasets.
SciPy and NLTK: These Python libraries are instrumental for computational linguistics and natural language processing researchers. They provide tools for text manipulation, corpus analysis, and linguistic data visualization.
Elsevier’s SciVerse is an application suite that integrates NLP to enhance search functionality, enabling more effective discovery and analysis of academic literature.
By integrating NLP tools into their workflow, the academic and research communities can more easily and precisely navigate the vast ocean of available data.
These technologies not only streamline the research process but also open up new avenues for discovery and innovation, reinforcing the importance of NLP in advancing knowledge and scholarly work.
Guide for organizations looking to leverage NLP tools for text analysis
This guide will walk you through starting points, identifying use cases, and implementing NLP tools effectively.
1. Understanding Your Needs
Assess Your Objectives: Define what you hope to achieve with NLP. Are you looking to improve customer service through sentiment analysis, enhance product recommendations, or automate data entry from unstructured text? Your objectives will guide your choice of tools.
Identify Your Data Sources: Determine where your text data is coming from. This could be social media, customer feedback, internal documents, or online articles. The nature of your data sources will influence the NLP features you need.
2. Exploring NLP Use Cases
To identify relevant use cases:
Research Industry Applications: Look into how other organizations in your sector use NLP. This can offer insights into potential applications and benefits.
Consider Cross-Industry Inspirations: Don’t limit your exploration to your industry. Applications in one field can often be adapted to another, offering innovative use cases.
3. Choosing the Right NLP Tools
Evaluate Tool Capabilities:
Look for tools that align with your specific needs. This might include language support, ease of integration, real-time processing capabilities, and the ability to handle the volume and variety of your data.
Trial and Experiment: Many NLP tools offer free trials or demo versions. Use these to experiment with different tools to find the one that best suits your needs.
Consider the Learning Curve:
Tools vary in complexity. When choosing an NLP solution, consider your team’s technical expertise and available training resources.
4. Implementing NLP in Your Workflow
Start Small and Scale: Begin with a pilot project focused on a specific use case. This allows you to measure the impact of NLP and adjust your strategy as needed before scaling up.
Integrate NLP with Existing Systems: NLP tools should work seamlessly with your existing software and systems for maximum impact. This might require custom integrations or the assistance of specialists.
5. Measuring Success and Iterating
Establish KPIs: Based on your objectives, define clear metrics for success. These could include increased customer satisfaction scores, reduced processing times, or improved sales conversions.
Gather Feedback and Iterate: NLP is not a “set it and forget it” solution. Regularly review your KPIs, gather user feedback, and adjust your approach to improve performance and ROI.
6. Staying Informed
Keep Learning: The field of NLP is rapidly evolving. Attend webinars, participate in forums, and follow thought leaders to stay informed about the latest advancements and tools.
Explore Advanced Applications: As you become more comfortable with NLP, consider exploring more advanced applications, such as machine learning models for predictive analysis or complex natural language understanding (NLU) tasks.
Final Thoughts
Implementing NLP tools for text analysis can significantly enhance your organization’s data analysis capabilities, leading to more informed decision-making and improved outcomes.
By understanding your needs, carefully selecting tools, and measuring success, you can effectively leverage the power of NLP to meet your business objectives.
Challenges and Limitations of NLP Tools
Understanding Linguistic Nuances and Context: One of the significant hurdles NLP faces is grasping the subtle layers of human language. This includes:
Idioms and Metaphors: Phrases whose meanings cannot be determined by their constituent words pose a challenge.
Cultural References: Texts rich in cultural nuances can lead to misinterpretations without deep contextual understanding.
Moreover, context plays a crucial role in how words are understood, and missing this can lead to inaccuracies in text interpretation.
Interpreting Sarcasm, Irony, and Mixed Sentiments: NLP tools often stumble over text that contains sarcasm or irony, largely because these rely heavily on the tone that is not always apparent in written form.
Similarly, texts that express mixed sentiments—combining positive and negative emotions—can confuse algorithms designed to categorize sentiments in a binary manner.
Privacy and Ethical Considerations: As NLP technologies sift through vast amounts of text data, they inevitably encounter personal information. This raises significant concerns regarding:
Data Privacy: Ensuring that individual data rights are respected.
Ethical Use: Balancing the benefits of NLP applications against potential misuse.
Future Trends in NLP for Text Analysis
Advances in AI and Machine Learning: The future of NLP is inextricably linked with the progression of AI and machine learning technologies. We’re looking at:
Improved algorithms for a deeper and more nuanced understanding of language.
Enhanced models that can more accurately interpret complex linguistic features.
Real-time Analysis Becoming Crucial: The demand for instant analysis is growing, especially in the business and social media sectors. The capability to assess customer feedback or public sentiment in real-time offers:
Quick Decision Making: Enabling businesses to respond to market changes swiftly.
Engagement Optimization: Allowing for immediate engagement with social media trends and conversations.
Evolving Applications in New Fields: NLP’s horizon is expanding into areas previously unimagined, from assisting in healthcare diagnostics to supporting the development of autonomous vehicles. This expansion is facilitated by:
Diverse Data Processing: The ability to interpret and analyze varied forms of text data.
Innovative Use Cases: Applying NLP in ways that revolutionize traditional processes across different industries.
By blending technological advancements with evolving needs and applications, NLP is set to overcome its current limitations and unlock new possibilities in text analysis and beyond.
FAQs
What are NLP tools?
NLP (Natural Language Processing) tools are software applications designed to analyze, understand, and interpret human language in text form, automating tasks like text mining and sentiment analysis.
How do NLP tools work?
These tools use machine learning and AI algorithms to process and analyze text data, identifying patterns, sentiments, and linguistic structures.
What is text mining?
Text mining involves extracting meaningful information and patterns from large text datasets, enabling data analysis and decision-making.
Can NLP tools analyze sentiments?
Yes, sentiment analysis is a key feature, allowing these tools to determine the emotions, opinions, and attitudes expressed in text data.
What industries benefit from NLP tools?
Industries such as marketing, finance, healthcare, and research use NLP tools for various applications, including customer feedback analysis and clinical data interpretation.
What challenges do NLP tools address?
NLP tools tackle challenges like interpreting complex linguistic nuances, managing large volumes of data, and addressing privacy concerns in text analysis.
Are NLP tools accurate?
While highly effective, their accuracy can vary based on the tool’s design, the language’s complexity, and the data’s quality.
Can NLP tools integrate with other software?
Key NLP tools are designed for easy integration with various platforms and software applications, enhancing their utility and application.to easily integrate
How do NLP tools handle linguistic nuances?
Advanced algorithms and machine learning models enable these tools to understand and interpret subtleties in language, though challenges remain with sarcasm and ambiguity.
What about privacy concerns with NLP tools?
Developers implement measures to protect sensitive information, and legal frameworks guide their use, but concerns remain a topic of ongoing discussion and improvement.
What future trends are shaping NLP tools?
Trends include integrating more advanced AI and machine learning for real-time analysis, improving accuracy, and expanding capabilities.
Can small businesses benefit from NLP tools?
NLP tools can help small businesses analyze customer feedback, market trends, and more, offering insights that support growth and customer satisfaction.
Do NLP tools require technical expertise to use?
While some technical knowledge can be helpful, many NLP tools are designed with user-friendly interfaces that make them accessible to non-technical users.
How is sentiment analysis useful in marketing?
Sentiment analysis helps marketers understand customer feelings towards products or brands, inform strategies, and improve customer experiences.
What advancements are being made in NLP for healthcare?
In healthcare, NLP advancements focus on extracting patient information from clinical notes and literature, improving diagnosis, treatment planning, and patient care.
Before going for SAP PO for Beginners Part 5 – Complete Overview on Enterprise Service Repository. Understand this is the fifth post in my blog series on “SAP PO – Cycle Coordination for novices”. In this post we will see the outline on Big business Administration Storehouse (ESR). We will likewise perceive how to create and move ESR objects in view of the idea we learned.
So, underneath is the substance we will be intricate in this instructional exercise:SAP PO for Beginners Part 5 – Complete Overview on Enterprise Service Repository
Accessing ESR
Importing Software Component into SAP PO ESR
Objects to be created in ESR
Example – Build ESR components for IDOC to File Interface
Transporting ESR objects from client to client using TPZ file
1. Accessing ESR: (SAP PO for Beginners Part 5 – Complete Overview on Enterprise Service Repository)
To get to ESR, explore to landing page http://:/dir/begin/index.jsp and click on Big business Administration Manufacturer which would open utilizing Java web start by downloading an impermanent JNLP record and tapping on it would open ESR.
Note: Introduce Java in your machine. Match JDK form of SAP PO (can be seen in Organization > Programming construct data) and java in your machine.
2. Importing Software Component into SAP PO ESR (SAP PO for Beginners Part 5 – Complete Overview on Enterprise Service Repository)
In ESR, you can see the imported programming part and its separate adaptation that you have made in SLD (which we examined in POST #3). Under this product part adaptation, you can make interface objects under namespace, which would look like beneath:
In above screenshot, you can view the component details:
1 – Software component
2 – Software component version
3 – Namespaces for each interface
4 – Imported IDOCs / RFCs can be viewed under Imported Objects
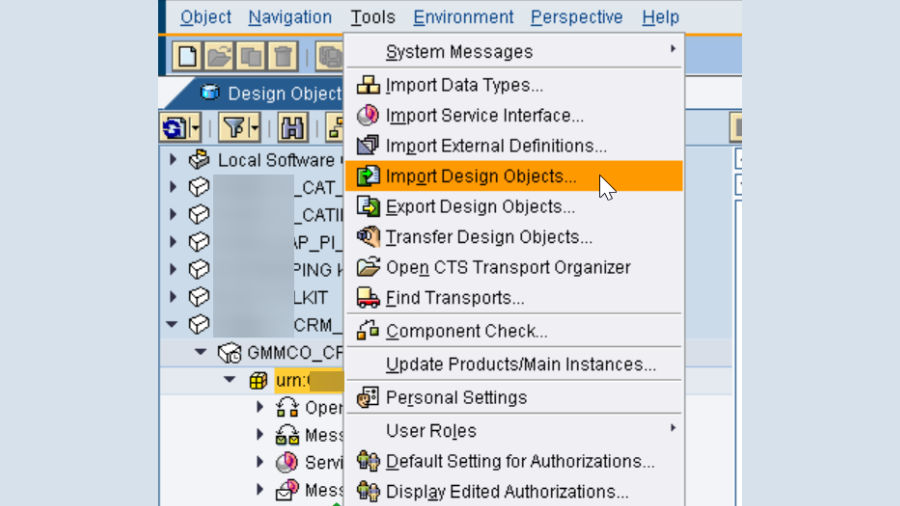
Subsequent to making Programming part in SLD, import it utilizing underneath technique:
Click on Menu Article – > New and click on IMPORT FROM SLD. Click In plain view button to see all SLDs accessible and select the one fundamental and snap on IMPORT which would make another SWC and SWCV in ESR.
3. Objects to be created in ESR:
ESR contains two tabs: Plan articles and Change records. Under Plan objects is where the product part and variants live. Change records contains the made connection points which should be enacted to be live.
Objects involved in ESR:
Data Type:
Data type is the place where we will be creating the field required to be transmitted to receiver system.
Message Type:
Message Type is used for encapsulating the data type. In laymen terms, it is nothing but, covering a layer for data type.
External Definitions:
Outside definitions are the simpler method for proclaiming the sort of fields that we will use in transmission. Like, in information type we will be physically adding the field name, field type. Be that as it may, in outside definition, it will be now composed and will be given by merchant which you simply have to import in ESR and use as same as message type.
Service Interfaces:
Administration Point of interaction comprises of transmission type, demand type.
If in the event of async interface, say the information is passed from SAP ECC to Drain PO, then, at that point, in ECC, ABAPers would have made a design that should be communicated. We want to get those subtleties and make one in PO as an information type and cover it with message type which we will import in help interface. Consequently, for async interface, you will make 2 help interfaces: One is of course Outbound with demand message type added and one is of Inbound with demand message type added (can be a similar one as outbound solicitation message type, however in the event that you are passing various fields subsequent to planning, new message type should be made and imported in inbound help interface).
In the event of sync interface, there will be 2 help interfaces, same as async, yet two contrasts are: one will be the method of transmission which will be simultaneous and other distinction is the solicitation and reaction message type import. For sync connection point, solicitation and reaction message type should be imported.
Message Mapping:
Message planning is where we will plan both the shipper fields and collector fields. The fields which is sent by ECC will be imported in source message as a message type and fields which should be shipped off collector will be imported in target message as a message type.
Operation Mapping:
Activity planning is the last move toward ESR, where all articles made so far gets stopped in Activity planning. The subtleties that we will import is:
Shipper Administration Connection point – SI Outbound which I displayed in picture above
Message Planning – Change of shipper information to recipient information
Recipient Administration Connection point – SI Inbound which I displayed in picture above
Assuming its coordinated (OM will naturally detect it while you import administration interface, where you will pronounce the sort of transmission), then, at that point, you should incorporate shipper message planning and another message planning for reaction that you get from target framework.
4. Example – Build ESR objects for IDOC to File Interface:
Scenario:
Sender – ECC (transporting IDOC)
Middleware – PO
Receiver – Third Party (File sent in form of XML)
Mode – Asynchronous
ESR Objects:
a. Import the SWC/SWCV from SLD to PO ESR.
b. Right snap on the product part adaptation and snap on NEW. Select Namespace under Workspaces segment in left sheet.
c. When made, right snap on the namespace, and click on NEW to make another information type (under interface protests) and give a substantial name and add important fields by tapping on + symbol to embed another component or hub. The Classification will be Component of course. On the off chance that you are don’t know about the sort of field, then select it as XSD:String which would oblige all sort of values. The 1:10 which is set apart against Receipt hub, is only, the receipt hub can seem multiple times in the record, yet the fields inside it very well may be accessible 1 time or ought not be accessible. After made, click on save and Actuate.
d. When information type is finished, we really want to typify it with message type. Thus, right snap on Namespace and click on NEW and select Message type (under interface objects). Import the made information type into it. Click on SAVE and enact.
e. Subsequent stage is to make Administration Point of interaction. Right snap on Namespace and click on NEW and select Help Connection point (under Connection point objects). The information you want to give is in three regions: Classification of transmission: Inbound/Outbound. Method of transmission and solicitation type.
You could have speculated, as in the past segments we examined like there will be 2 help connection points of SI-Outbound and SI – Inbound. Be that as it may, here we don’t need to make SI-Outbound as we have IDOC as the SI-Outbound. In OM, we will import the IDOC instead of SI-Outbound.
f. Subsequent stage is to make Message Planning. In Message Planning, we will choose source message and target message.
Source Message – IDOC (which will be sent from ECC)
Target Message – Message Type
Map the essential fields from IDOC to Message Type
Before selecting IDOC as source message, import the IDOC first from ECC. For importing the IDOC, you need to right click on IMPORTED OBJECTS and select IMPORT OF SAP OBJECTS.
By this way, you can import the IDOCs/RFCs into PO ESR and use it for mapping. Click on the dropdown and select the required IDOC and click on FINISH. Once imported, activate the IDOC if not done automatically.
Once import and selection of source and target message is done, you will be presented with two sections like below: 1 – Section to import, 2 – Graphical mapping
1 – is where we do the import of source and target messages
2 – is where we perform conditions or mappings for each field. In the above case, what I have done is, if SO_Ref field exists in IDOC, then map the SO Internal reference no. directly to the output field. If it doesn’t exist, then map IHREZ field to the target.
To check if value exists in field, we have EXISTS function, which can be used for this purpose.
MAP WITH DEFAULT -> It fills the field with default value if the IDOC/source message doesn’t contain any value. You can declare the default value by double clicking on it and entering the value.
There are so many functions available in graphical mapping area, where each node (Arithmetic, Boolean, Text, Date … ) contains many functions. By this way we can transform the source data and map it to the target data as requested from vendor.
If you want to test the message mapping by navigating to the TEST tab and entering the value and clicking on the transform button.
g. Final step is to create Operation Mapping. In Operation mapping, we will import the source operation and target operation. In this case, it will be IDOC as source (instead of SI-Outbound) and target operation as SI-Inbound service interface.
Operation mapping sums up the interface scenario, where the source message will be of IDOC and after that it has to pass through Message mapping conversion and transform to new structure, which is target operation.
Once all done, you will see the structure like below under your software component version.
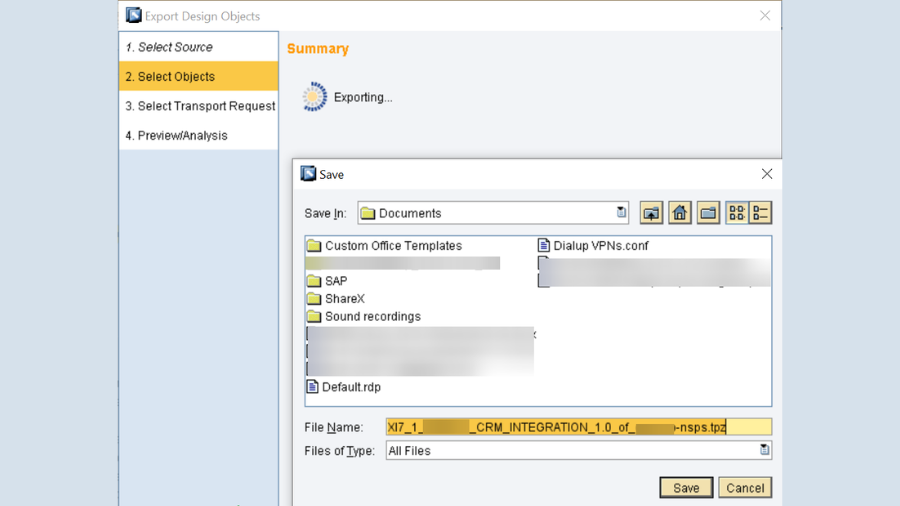
5. Transporting ESR objects from client to client using TPZ file
Expect that ESR and ID (for ID improvement, we will see in next post) objects are finished and we really want to move it to Quality PO framework. There are 2 methods for shipping the ESR contents:
– Export ESR contents as TPZ file
– CTS+ Transport
The well known approach to shipping the ESR content is through TPZ document, which is a simple approach to doing.
Prior to sending out the document, ensure the product part and part adaptation are as of now imported in the objective framework, if not it would wind up in import mistake. While trading the product part itself you can incorporate all the namespaces under it which is Acceptable as far as first time send out, yet don’t bother doing it each time you send out, in light of the fact that it will again duplicate all namespaces under it.
Better to right tap on the namespace and click on Commodity.
Select “Transport utilizing Record Framework” and snap on Proceed. Select the namespaces (namespaces incorporates objects we made) which you need to product and snap on FINISH. A TPZ expansion document will be downloaded to your framework.
Click on CLIENT choice where framework would ask, where the record is available. Find the record and import it. There’s nothing more to it.
Click on CLIENT choice where framework would ask, where the record is available. Find the record and import it. There’s nothing more to it.
SAP Fiori is the user interface or user experience (UX) that supplements and can replace the SAP GUI. This streamlined application uses tiles to encapsulate standard tasks, such as approving purchase requisitions, viewing sales orders, and approving timesheets. What is SAP Fiori? This is still a question worth asking as the UX is evolving and getting more sophisticated since its initial launch in 2013.
Fiori is a streamlined application, delivering a role-based user experience that can be personalized across all lines of business, tasks, and devices. It uses tiles to encapsulate standard tasks like viewing sales orders or approving timesheets. Based on customer input, SAP devised the SAP Fiori UX with user-friendliness and ease of use in mind. The UX also provides mobile deployment capabilities so users can work without needing access to a computer.
Ultimately, there’s a night and day difference between the SAP GUI and SAP Fiori UX. While the older GUI was bulky and hard to learn or train on, SAP Fiori has the seamless movements and controls you would expect out of any mobile application. The screens are simple, customizable, and modern, and there are none of the unnecessary tabs and fields the previous UX had.
SAP Fiori 2.0
SAP Fiori 2.0 launched in October 2016 as an update to Fiori adding UX functions that were missing in the first version, e.g. enhanced navigation, multi-application management, and proactive system notifications. Developed as the latest evolution for SAP HANA and S/4HANA, version 2.0 offers a new visual design that can adapt Fiori UIs to corporate identities. Other features introduced in SAP Fiori 2.0 include an Overview Page, which streamlines information flow, List Reports, Object Pages, and a Launchpad for navigating apps. The Launchpad enables querying for apps that may be required for new processes and new ways to organize tools intuitively. A Viewport expands users’ desktops to the right and left. SAP Fiori 3.0 is the new target design being planned from SAP, which evolves the design system to fully support the Intelligent Suite.
The Benefits of Fiori
What are some SAP Fiori benefits? Users report increased productivity with Fiori. Research reveals that Fiori delivers a 64% reduction in time needed to complete a task compared to SAP GUI. It’s simpler and easier to learn, so it drives a strong adoption rate and cuts training time. Employees tend to get less frustrated with Fiori.
SAP Fiori offers more intuitive workflows that feature business logic instead of SAP logic. Users who are not experts in SAP find this easier to use. People can move around in the organization more readily. They don’t have to retrain on SAP to switch roles. The UX also results in improved mobility. In contrast to the mouse-and-keyboard structure of the SAP GUI, Fiori-based applications are usable by mobile employees on a variety of device types.
On the application development side, users of SAP Fiori on HANA find less need to build their own tools. This is partly the result of the expanding Fiori library. In addition, the SAP/Apple partnership provides a range of preset app options.
SAP Fiori Architecture
Developed to meet new enterprise IT criteria, SAP devised Fiori to be available on-demand in the cloud and on-premises. Fiori must also support multiple device form factors. Some architectural principles underpinning Fiori include:
Central Access to apps through the SAP Fiori launchpad – supporting personalization, navigation and configuration
Security with single sign-on (SSO) as well as role-based authentication and authorization
Open Data Protocol (OData), which facilitates secure provisioning and data consumption
Fiori also embeds analytics into apps, if those are required. Developers can engage in custom development, so they are able to design, build and deploy SAP Fiori apps rapidly. They achieve this goal by using Fiori’s enterprise-ready UI development toolkit, which is based on SAPUI5 with support for HTML5 and JavaScript. This makes possible app extensibility, with possible enhancements to apps through the SAP Web IDE and its templates.
As a result of this architecture, SAP Fiori is not tied to a specific device, session, or user. Fiori app users can start a task and save it in an incomplete form. Later, they can resume working on it from a different device. The app automatically saves data asynchronously. Users can even hand off partially completed tasks to one another.
Deployment Options
When it comes to SAP Fiori deployment options, admins have five basic choices: Fiori Front End Server (FES) embedded deployment, FES hub deployment, gateway embedded, gateway hub, and cloud. Each approach suits a specific set of requirements and SAP landscape preferences.
FES embedded deployment, where Fiori is embedded in a single SAP landscape, is the simplest deployment option9. It is best for situations where there is a single Fiori instance running.
FES hub deployment, which bundles the Fiori UI components, SAP Launchpad and SAP Gateway. Business logic and traditional UIs stay on the back end, so you can integrate multiple back end systems like SAP CRM and SRM.
Gateway embedded, where the SAP Gateway is embedded in the back end, which makes it possible to integrate cloud FES instances with a cloud connector.
Gateway hub, here SAP Gateway serves as a hub – making it easy to connect the backend with FES in the cloud
SAP Fiori Cloud, with FES in the cloud on a standalone basis. It connects to back end systems that are on-premises.
Launchpad Configuration
SAP Fiori Launchpad configuration involves a shell that hosts SAP Fiori apps. At the same time, the shell provides the apps with configuration, navigation, and personalization services, along with embedded support. The result is tile-based information architecture. Each tile represents a business application, which can be launched by the user. Tiles display according to the user’s role and indicate live statuses, such as how the number of open tasks.
SAP GUI vs. Fiori
Ultimately, how can you compare the SAP GUI vs. Fiori? Fiori offers a number of clear benefits over SAP GUI, including better productivity and multi-device task workflows. In architectural terms, Fiori gives you the advantage of RESTful APIs, which are more fluid and easily connected than traditional SAP application integration tools.
Fiori is projected to replace SAP GUI, particularly in organizations that are migrating to HANA and S/4HANA. This is mostly the result of a better UX overall, developed to enhance the new database. The older GUI is comparatively bulky and difficult to learn (or train). Fiori is built in HTML5. As a result, it has the kind of seamless movements and controls you expect from a modern mobile app. The screens are simple and clean in design, matching what users expect from today’s applications.
Moving forward with SAP Fiori
SAP Fiori is simple for users, but behind the scenes, it can be challenging to set up and manage. Configuration and gateways require expertise to navigate the pitfalls of the project as well as being able to identify the additional stakeholders needed for mobilizing your applications. Additionally, if you’re harnessing SAP Fiori as part of a more complex project, such as an SAP HANA migration, an SAP-certified partner like Secure-24 can ease the transition and help optimize your new IT landscape.
What is the difference between SAP and SAP Fiori?
SAP and SAP Fiori are related but distinct components within the SAP ecosystem. Here’s a breakdown of their differences:
SAP: SAP (Systems, Applications, and Products in Data Processing) is a leading enterprise resource planning (ERP) software that provides integrated business solutions to manage various aspects of an organization, such as finance, human resources, sales, procurement, inventory, and more. SAP is a comprehensive suite of applications designed to streamline business processes, enhance efficiency, and provide valuable insights through data analytics.
SAP Fiori: SAP Fiori is a user experience (UX) and design framework developed by SAP to improve the user interface (UI) and user experience of SAP applications. It focuses on providing a modern, intuitive, and consistent user interface across different devices, including desktops, tablets, and smartphones. SAP Fiori aims to make SAP applications more user-friendly, responsive, and visually appealing.
Key differences between SAP and SAP Fiori:
Scope: SAP is the entire suite of ERP applications that cover various business functions, while SAP Fiori is a design framework focused on improving the user experience for SAP applications.
Functionality: SAP offers a wide range of functionalities to manage business processes across departments, while SAP Fiori enhances the user interface and user experience of specific SAP applications.
User Experience: SAP’s traditional user interfaces have been criticized for their complexity and lack of user-friendliness. SAP Fiori addresses these concerns by providing a more modern, streamlined, and intuitive user experience.
Device Support: SAP Fiori is designed with responsive design principles, allowing it to adapt and provide an optimal user experience on various devices, including desktops, tablets, and smartphones. Traditional SAP interfaces might not be as well-suited for mobile devices.
Adoption: SAP Fiori is not a separate application or module but a design language and set of guidelines. It can be applied to specific SAP applications to enhance their user experience. SAP customers can choose to adopt SAP Fiori and apply it to their existing SAP applications.
In summary, SAP is the overarching ERP software suite that covers a wide range of business processes, while SAP Fiori is a design framework focused on improving the user experience of specific SAP applications. By incorporating SAP Fiori, SAP aims to make its applications more user-friendly, visually appealing, and accessible across different devices.
Whether you’re just getting started with ABAP (Advanced Business Application Programming) or have been coding for a while, you’ve probably hit that frustrating wall where things just don’t work as expected. Don’t worry—you’re not alone. Every ABAP developer, from beginner to pro, faces bugs, performance issues, and mysterious short dumps. But with the right approach, you can troubleshoot like a pro, save time, and write cleaner, more efficient code.
In this guide, we’ll walk through the Top 5 Troubleshooting Tips for ABAP Developers, helping you understand not just the “how” but also the “why” behind each solution. This is your first step toward mastering ABAP, improving your problem-solving skills, and advancing your SAP career.
The ABAP Debugger is your best friend when things go wrong. It allows you to step through your code line by line and inspect the values of variables, structures, and tables during runtime.
💡 Real-World Example:
Imagine your report isn’t displaying the correct sales data. With the debugger, you can step into the internal table population logic and identify where the data is getting filtered incorrectly.
🛠️ Pro Tip:
Use breakpoints strategically and explore the “new” debugger for an enhanced UI experience. You can even set conditional breakpoints to pause execution only when specific conditions are met.
🔍 2. Read and Interpret Short Dumps (ST22)
If your program crashes unexpectedly, check transaction ST22—SAP’s Short Dump Analysis tool. It provides detailed logs of runtime errors, including the exact line number and a description of the issue.
You might see a “READ_TABLE_LINE_TOO_LARGE” error. This tells you the data structure you’re trying to read is larger than expected, often due to a mismatch between internal table types.
🛠️ Pro Tip:
Look beyond the error line. Sometimes the actual problem originates earlier in the program. Use the call stack in the dump to trace the issue from the root.
🚀 3. Monitor Performance with SAT and ST05
In the world of enterprise applications, performance is king. Tools like SAT (Runtime Analysis) and ST05 (SQL Trace) can help you find performance bottlenecks and optimize your ABAP programs.
💡 Use Case:
If your report is taking too long to execute, SAT helps you pinpoint which methods or function modules are consuming the most time. ST05 can show you inefficient database queries.
🛠️ Pro Tip:
Focus on reducing database round trips. Looping over SELECT statements is a common beginner mistake—retrieve data in bulk instead.
🧩 4. Check Data Dictionary and Object Consistency
Sometimes the issue isn’t in your logic but in the underlying Data Dictionary objects—like mismatched data types, missing foreign keys, or inconsistent domain definitions.
💡 Scenario:
You’re getting a runtime error when moving data from one structure to another. Checking SE11 might reveal that the fields look similar but are of different data types.
🛠️ Pro Tip:
Always use LIKE or TYPE declarations from the Data Dictionary to ensure consistent typing across programs and modules. Run consistency checks (SE14, SE11) regularly after changes.
🛠️ 5. Use System Logs and Job Logs for Background Issues
When working with background jobs or scheduled programs, errors might not appear in the frontend. Instead, you’ll need to check logs via SM21 (System Log) and SM37 (Job Monitoring).
💡 Example:
A batch job that updates customer master data fails silently. In SM37, you can view job logs to identify authorization errors or timeouts that aren’t visible in ST22.
🛠️ Pro Tip:
Schedule a test run of your background jobs in dialog mode first. This allows you to catch logical or data errors before they go into production.
As SAP systems continue to evolve, with S/4HANA and cloud-based SAP solutions on the rise, companies expect developers to write high-performing, scalable, and error-free code. Mastering the art of troubleshooting not only makes you a better developer—it also increases your value in the job market.
💬 According to a 2024 survey by SAPinsider, 85% of companies cited efficient issue resolution as a top skill when hiring ABAP developers.
Whether you’re aiming for your first SAP job or looking to upskill, these foundational troubleshooting techniques will give you an edge.
💡 Final Thoughts
Learning ABAP can feel overwhelming at first, especially when errors seem cryptic or unfamiliar. But here’s the good news: every problem you face is an opportunity to level up your skills. With the right mindset and tools, you’ll go from frustrated to confident in no time.
Remember, even SAP experts started where you are now—with their first debug session, their first short dump, and their first “aha!” moment.
🚀 Ready to Go Deeper?
Your ABAP journey doesn’t have to stop here. If you’re serious about mastering ABAP and boosting your SAP career, check out our curated ABAP courses, hands-on tutorials, and certification guides on our website.
👉 Explore Advanced ABAP Courses Now
✅ Blog Summary
Top 5 ABAP Troubleshooting Tips:
Use the ABAP Debugger to inspect logic and variables.
Analyze short dumps with ST22 for runtime errors.
Monitor performance using SAT and ST05.
Verify data consistency with SE11 and SE14.
Check logs for background job issues in SM37 and SM2
In today’s fast-moving digital economy, businesses are constantly seeking ways to streamline operations, improve agility, and cut costs. One of the most effective ways to achieve this? Integrating powerful enterprise tools like SAPwith flexible, scalable platforms like Oracle Cloud.
Whether you’re a business decision-maker, a finance associate, or just someone curious about enterprise IT, understanding how Oracle Cloud integrates with SAP environments is a powerful step toward digital transformation — and financial success for your organization.
Let’s break down the essentials in a conversational and beginner-friendly way.
🌐 What is Oracle Cloud?
Oracle Cloud is a comprehensive suite of cloud services including Infrastructure as a Service (IaaS), Platform as a Service (PaaS), and Software as a Service (SaaS). It’s used by businesses around the world to run workloads, manage databases, and scale applications.
Key benefits of Oracle Cloud:
High-performance computing
Cost-effective storage
Secure, scalable environments
AI and analytics capabilities
🏢 What is SAP?
SAP (Systems, Applications, and Products in Data Processing) is one of the world’s leading Enterprise Resource Planning (ERP) systems. It’s used to manage everything from supply chain logistics and finance to human resources and customer relationships.
Popular SAP products:
SAP S/4HANA
SAP ECC
SAP Business One
Most large enterprises use SAP as the digital core of their operations.
🔄 Why Integrate Oracle Cloud with SAP?
Here’s the big idea: Businesses that use SAP often face high on-premises infrastructure costs, slow performance, or limited flexibility. Integrating Oracle Cloud with SAP allows organizations to:
Modernize legacy SAP systems without a full replacement
Improve performance of SAP applications with scalable cloud infrastructure
Enhance disaster recovery and security
Lower TCO (total cost of ownership) by reducing physical infrastructure
In short, you’re unlocking more value from your existing SAP investment.
Oracle Cloud offers certified infrastructure for running SAP workloads, meaning it meets SAP’s strict requirements for performance and compatibility.
There are three major integration approaches:
1. Running SAP on Oracle Cloud Infrastructure (OCI)
SAP applications and databases can be hosted directly on OCI, offering high availability and fast data processing. This is ideal for large-scale operations using SAP S/4HANA.
✅ Tip: Many businesses start with moving non-production SAP systems (like development or testing environments) to OCI before fully migrating.
2. Hybrid Integration
You can run some SAP systems on-premises and others in Oracle Cloud. This hybrid model is great for companies transitioning to the cloud in stages.
✅ Real-world example: A retail company keeps their customer database on-premise for compliance but runs SAP analytics in Oracle Cloud to take advantage of AI tools.
3. Connecting SAP with Oracle Cloud Services
Use Oracle Cloud’s advanced services (e.g., Oracle Autonomous Database, AI/ML tools, or analytics) alongside your SAP environment via APIs and connectors. This enhances your SAP data with smart tools for reporting and decision-making.
✅ Practical tip: Use Oracle Analytics Cloud with SAP to get deep insights into sales trends, employee productivity, or supply chain performance.
📊 Market Trends: Why This Matters Now
Here’s the big picture: According to Gartner and IDC, over 70% of enterprises using SAP are planning cloud migrations by 2027, and Oracle Cloud is one of the top platforms being considered.
Industry insights:
SAP support for older systems ends soon (e.g., SAP ECC by 2027), driving cloud transitions.
Regulatory pressures require better data compliance and security — a strong point of OCI.
Real-time analytics is a growing need; Oracle’s AI tools can fill that gap for SAP users.
If you’re in a growing business or an industry with heavy data use — retail, finance, logistics — this integration can give you a major competitive edge.
🧩 Common Use Cases of Oracle Cloud + SAP
Let’s make it real. Here’s how companies are using this integration today:
Finance teams using SAP for core processes and Oracle Cloud for analytics dashboards
Manufacturers managing production schedules in SAP, while predictive maintenance runs in Oracle’s AI engine
Retail chains using Oracle’s infrastructure to ensure SAP systems scale during seasonal traffic spikes
💡 Getting Started: Your First Steps
If this sounds complex, don’t worry — you don’t have to dive in all at once. Here’s how beginners (and companies) typically start:
Assess current SAP infrastructure
Choose one SAP workload to move or enhance
Engage cloud experts or IT partners
Start small — test Oracle Cloud for non-critical SAP systems
Scale and automate based on success
Oracle also offers preconfigured SAP environments and automation tools to make this easier.
✅ Beginner tip: Use Oracle’s Cloud Calculator to estimate costs before migrating.
🎓 Take the Next Step Toward Digital Mastery
If you’re serious about building cloud literacy, improving your career, or helping your business thrive — now’s the time to level up.
👉 Explore our beginner-to-advanced cloud integration courses, where we break down:
Cloud architecture basics
SAP migration strategies
Real-life case studies
Hands-on Oracle Cloud labs
With the right knowledge, you can confidently guide your company — or your career — into the future of enterprise tech.
🌟 Conclusion
Oracle Cloud and SAP aren’t just big enterprise buzzwords. Together, they form a powerful engine for smarter, faster, and more resilient business operations. Whether you’re part of a large enterprise or just starting your journey in IT and finance, understanding how these two giants work together is a valuable step toward long-term success.
Just 3 Changes to Improve the SAP ABAP Performance by 95 Percent. For one of our custom program, assuming the Business Group executed it totally open, it required very nearly 10,000 seconds. So they were encouraged to continuously run the report for certain information values in the determination screen. Regardless of whether they need to execute for every one of the clients (clear open) in the determination screen, they were asked not to leave it clear. All things considered, they were approached to put clients input field in reaches and afterward run various positions. Let’s get started with Just 3 Changes to Improve the SAP ABAP Performance by 95 Percent.
Be that as it may, one of the Business Colleagues was troubled. He could have done without the plan to run different positions and afterward collect the outcomes. He needed to run the report completely open and have only one spool with the result. He made his voice clearly, made it heard and persuaded the administration to tune this program. Therefore, this feared program came to our plate to break down in the event that we can make some improvement.
Our most memorable move was to run the work completely open and check what amount of time it required. It required 9991 seconds unequivocally. We ran it completely open on numerous occasions to check assuming any support would do any deceive. Yet, the occupation got some margin to wrap up.
Then we took a gander at the program and did two or three changes, which we accepted had the most extreme effect. So, we followed “The Pareto Guideline”, otherwise called the “80/20 Rule”. I’m certain a large portion of you have caught wind of this 80-20 Rule. That’s what the law expresses, for some occasions, generally 80% of the impacts come from 20% of the causes.
In our unique situation, 80% of Execution Issues have 20% causes. Or on the other hand, 80% of Execution can be improved by fixing the main 20% terrible programming.
We did only 3 changes and the effect was colossal. Check the underneath work run Length. With only 3 changes, the run time tumbled from 9991 seconds to 496 seconds.
Indeed, an improvement of more than 95%. Isn’t it staggering? Albeit 496 seconds is definitely not an optimal opportunity to finish a report. Yet, to get that decrease in time with only some minor code change was truly worth focusing on.
A few people might request evidence. How might we accept assuming both the positions ran for same information and gave a similar output.?Yes, it did. Also, here is the confirmation.
This is the Info. We need for all Clients. And every one of our clients start with 0.
The work which ran for 9991 seconds gave 632 Pages yield.
The work which ran for minimal under 500 seconds likewise gave 632 Pages yield
Presently, you could be interested to be aware, what was the mysterious change which we did? However, not a big deal.
You may be frustrated in the wake of learning the change.
Yet at the same time, we needed to distribute this article on the grounds that occasionally we don’t have to move the mountain to achieve something. Now and again, the arrangement is straightforward and inside our span. We generally need NOT must have In that frame of mind to see the exhibition improvement.
Now and again, tweaking our code in the conventional data set could get the job done. This is only a guide to illustrate, how awful we can program. On the off chance that all ABAPers deal with minor things like displayed underneath, the client’s SAP Framework would be a lot quicker, smoother and all the more significantly upgraded even without HANA.
This doesn’t mean we can keep away from HANA.
Changes done:
Change Standard Table Types to Hashed and Sorted Internal Tables wherever possible.
Really take a look at the remarked Information in green. All Standard Inward Tables are supplant by Hashed and Arranged Inside table.
Alternative for ‘For All Entries’
HRP1001 has more than 4.5 million passages in our framework and the beneath FOR ALL Sections (FAE) select took until the end of time.
Before Code Change
    SELECT * FROM hrp1001 INTO TABLE it_hrp1001
      FOR ALL ENTRIES IN it_pa0001
      WHERE objid = it_pa0001-plans
      AND begda LE sy-datum
      AND endda GE sy-datum.
After Code Change
In the wake of breaking down the runtime information, we found that the FAE driver table IT_PA0001 had just 7000 one of a kind passages, yet the FOR ALL Sections took practically enduring to finish on the grounds that the chose data set had over 4.5 million records. So we chose to put these 7000 odd passages to Reach Table and use it in the WHERE provision.
  RANGES: lr_objid   FOR hrp1001-objid.
  DATA:   lwa_objid  LIKE LINE OF lr_objid.

  DATA:   lit_pa0001 TYPE STANDARD TABLE OF pa0001.

  IF it_pa0001 IS NOT INITIAL.
*   Keep a local copy
    lit_pa0001 = it_pa0001[].

    SORT lit_pa0001[] BY plans.

*   Keep unique entries
    DELETE ADJACENT DUPLICATES FROM lit_pa0001 COMPARING plans.

*   Populate the range table which can be used in WHERE clause
    lwa_objid-sign = 'I'.
    lwa_objid-option = 'EQ'.
    LOOP AT lit_pa0001 INTO DATA(lwa_pa0001).
      lwa_objid-low = lwa_pa0001-plans.
      APPEND lwa_objid TO lr_objid.
    ENDLOOP.

*   FAE replaced by Range Table
    SELECT * FROM hrp1001 INTO TABLE it_hrp1001
      WHERE objid IN lr_objid[]
      AND begda LE sy-datum
      AND endda GE sy-datum.

  ENDIF.
3. As a matter of fact, there is no Third point. This is the eventual outcome of Primary point. The Circles and Peruses of HASHED and Arranged tables are of course proficient than STANDARD Interior Tables.
There’s nothing more to it. Only the over two changes further developed the presentation decisively (by 95%). Ideally, this article would rouse you to utilize the Arranged and HASHed table more frequently than STANDARD.
Question: Before we close today, let me ask you, Do you have any idea about what number of kinds of interior tables we have in SAP?
Reply: Did you say 3? Standard/Arranged/Hashed? Ideally not.
As a general rule, are just 2 kinds of Interior tables. File Table and HASHED Tables.
Then what might be said about Norm and Arranged? The two of them fall under Record Table umbrella.
This picture would explain, Kinds of Inward Tables in SAP.
Yet, for what reason would we say we are covering Inside Tables here?
Isn’t Inward Tables hypothesis for novices in ABAP?
Valid, inward tables are the fundamental idea which is told to novices. In any case, now and again, we want to remind our accomplished people also that the second conspicuous guilty party for a large portion of the Presentation Issues after Data set Admittance is tasks with Inner tables. Off-base or Inaccurate Data set Get presumably causes issue, yet off-base Interior Table at some unacceptable spot likewise adds affront to the injury.
In this way, Inside Tables being the focal build inside the application improvement with ABAP, its significance can’t be subverted.
How to chose the internal table type?
Standard Interior Table (Listed)
I. Assuming that you are certain, your inner table would not very many records (under 100) it could be fitting to swear off an unequivocal key by and large (which is required in arranged and hashed tables) then, at that point, Standard Inside tables can be utilized. Standard tables are appropriate for information which are once in a long while or not the slightest bit looked for explicit
ii. On the off chance that the interior table information are seldom or not by any stretch of the imagination looked for explicit models then Standard Inner Table would be reasonable for such information.
iii. Thumb Rule – In the event that searches are not required in the inner table, it does not merit the expenses to make and to keep the extra key-structures required for the other table sorts (arranged/hashed). Utilize Standard Inside Table securely.
Arranged Inward Table (Recorded)
I. If you have any desire to Circle with WHERE condition. On the off chance that this is finished with appropriate Keys (even fractional), the inside fabricated key-designs will be utilized to track down the relating sections as fast as could be expected.
ii. In the event that the information should be looked with Keys. On the off chance that the Peruses would be finished with Incomplete Keys, Arranged is the best table sort not Hashed table.
iii. Thumb Rule – In the event that the unambiguity of the Keys can’t be ensured for example just Halfway Keys are known, then Arranged Inward Tables ought to be utilized.
Hashed Interior Table (Hashed)
I. Assuming you have the Total Key (NOT Fractional), Hashed Inner Table is your most ideal decision.
ii. On the off chance that unambiguity of the Keys CAN be ensured for example Full Keys are accessible for the hunts, Hashed in the Best.
iii. Thumb Rule – In the event that the pursuit term generally utilizes the total key (every one of the fields of the key are checked against the comparing esteem) Hashed table sort is normally awesome.
Outline of the above clarification of Time Expenses for Key Access.
Rundown of the above clarification for When to Utilize Which Table Sort?
As our SAP Tutors generally say, on the off chance that we could advance our custom codes in the conventional data set, we could accomplish enormous improvement in execution even before we move to HANA. Hope enjoyed “Just 3 Changes to Improve the SAP ABAP Performance by 95 Percent” blog.
Parallel Processing Technique in SAP ABAP using SPTA Framework: SPTA Parallel Processing Framework in ABAP
With the approach of HANA and In-Memory handling, this point could look mis-planned. Yet, there are numerous associations, which actually have no arrangement to move to HANA inside couples of years. As is commonly said, the show should continue and that spurred us to distribute this long forthcoming article here for those ABAPers, who actually need to bargain a great many lines in cluster occupations and who feel the “Evenings are getting excessively more limited to execute those bunch occupations in SAP” (propelled from a companions blog). Let’s go deep into the SPTA Parallel Processing Framework in ABAP.
Why parallel processing required?
Parallel processing is required mainly to improve the performance of any ABAP program. Using parallel processing framework we can significantly improve the processing time of any program, particularly where data volume is very high. The basic concept behind the parallel processing framework is to divide the large volume of data into several small work packets and process different work packets into different tasks. So each work process will be processed at the same time in parallels and it will significantly reduce time. Nowadays every distribution-related projects have a large volume of data so invoking parallel processing framework is very useful to reduce time.
Conventional Parallel Processing
We can use parallel processing framework by calling any RFC enabled function module in NEW TASK. In this way, after determining the number of work packets we can create different tasks for each work packets and process them in parallel.
Why SPTA structure required?
SPTA structure is the most modern and gotten system for equal handling given by SAP. If we have any desire to deal with numerous records and need to refresh/check different data set tables in equal, all things considered, utilizing traditional method for conjuring equal handling is troublesome and there can be some ABAP memory issue. In any case, in SPTA system there are work in security for all the ABAP memory related issues so it is exceptionally secure. Additionally, SPTA system is extremely simple to carry out and everything the equal handling work is dealt with by SAP we don’t have to annoy how to deal with it. Along these lines, it is likewise an extremely refined structure.
SPTA Equal Handling Structure
To conjure SPTA structure we really want to call capability module SPTA_PARA_PROCESS_START_2. This is a standard SAP gave capability module. In this capability module, we need to utilize three subroutines to construct our own handling rationale.
BEFORE_RFC_CALLBACK_FORM: This routine is called by the capability module prior to calling the RFC capability module. Here we need to fabricate different work bundles which we need to process in the RFC capability module.
IN_RFC_CALLBACK_FORM: This routine is called by the capability module after work bundles are made. In this daily practice, we can utilize our own RFC empowered capability module or custom code to deal with each work parcels.
AFTER_RFC_CALLBACK_FORM: This routine is called toward the end by the capability module. In the wake of handling of practically everything parcels, we need to gather every one of the handled information.
We have referenced server bunch likewise while calling the capability module. The server gathering can be kept up with in the RZ12 exchange. However, this is Premise action.
In the evolving boundary, we need to pass our complete inner table which contains every one of the information. From this inward table, we will make different little work bundles (for example Interior tables) for equal handling.
In the get back to program name, we need to pass the calling program name.
Trust you are not mistaking Equal Handling for Equal Cursor Strategy. If it’s not too much trouble, read this Graphical and Measurable Examination of Equal Cursor Procedure in Circles.
Presently we will talk about the really three subroutines and how to call them in subtleties.
BEFORE_RFC_CALLBACK_FORM: In this daily schedule, we need to make little inner tables which we are alluding as work parcels for equal handling in the IN RFC schedule. If it’s not too much trouble, allude the beneath screen capture.
Every one of the boundaries which are passed in this subroutine are compulsory. Here first we need to make little work parcels. In the above code, it is characterized like one work bundle will contain 10 records. In the wake of making one work parcel I have ENCODE the information for additional downstream handling. Additionally, we need to illuminate task chief that one RFC can be begun by passing ‘X’ in the START_RFC field.
IN_RFC_CALLBACK_FORM: In this daily schedule, we need to compose own handling rationale to deal with every one of the information. We can call a RFC empowered capability module from this everyday practice or we can compose our own rationale inside this routine moreover. For each work bundles, various errands will be made and each undertaking will call this everyday practice for handling of information. Kindly allude beneath screen capture.
In the above code, I have first decoded the encoded information which is coming from BEFORE_RFC_CALLBACK_FORM routine for each work bundles. Then, at that point, compose your own rationale or call RFC empowered capability module for handling. In the above model, I just arranged the arbitrary information. On the other hand I have encoded information for the downstream handling in AFTER_RFC_CALLBACK_FORM schedule.
AFTER_RFC_CALLBACK_FORM: In this routine after processing of all the data we have to collect data. In this routine basically, we have to prepare final internal table after all the data processing. Please refer the attached screenshot.
In the above model I have decoded the information once more and afterward showed all the record. Here in the event that any unit fizzles during handling in IN_RFC_CALLBACK_FORM no information will be accessible to gather since, supposing that any unit bombs we should not get ready last table with less number of legitimate records. We can get the bombed unit by utilizing IF_RFCSUBRC and IF_RFCMSG.
So by utilizing this capability module, we can conjure equal handling system in a complex and secure way.
If it’s not too much trouble, download the code utilized in the above showing from Here.
Kindly note: We can plan our own equal handling strategy without utilizing SPTA System. The idea continues as before in the hand craft too for example Records get handled into various errands and that runs equal. So the handling time is diminished complex.
In one of our past articles, we discussed the Arranging Calculation rationale which is asked in numerous Level One MNCs. We showed not many ways of accomplishing it. In the wake of going through the different Arranging strategy, our companion Stephan Koester from Koester-Counseling was questions to approve the exhibition of the various SORTs. In this will see SORTing Algorithm – Performance Comparision.
In this way, he thought of one program utilizing similar code bits and attempted to figure out which Arranging Calculation is the most advanced one. The finding is very fascinating.
For the examination, Stephan made the tables with columns 2 to the power n where n beginning from 1 till 13. So, the table had column counts 2, 4, 8, 16, 32, 64, 128, 256, 512, 1024, 2048, 4096, 8192. Let’s go for practical on SORTing Algorithm – Performance Comparision.
Guinea Pig for the Experiment – i.e The Test Data
To test the presentation better, he made two tables. One in rising request from 2 till 2 to the force of 13. What’s more, the subsequent table in sliding request from 2 to the force of 13 till 2.
Techniques Used
Assuming you really take a look at the code beneath, he utilized 3 strategies to Sort and record the time.
Sorted Non Unique
Sorted Unique
Manual Sort Algorithm
Program with 3 SORT Algorithm
REPORT zstkoes_sort_performance.
DATA:
  lv_time_first  TYPE timestampl,
  lv_time_second TYPE timestampl,
  lv_time_third  TYPE timestampl,
  lv_time_fourth TYPE timestampl,
  lv_time_fifth  TYPE timestampl,
  lv_time_sixth  TYPE timestampl.

DATA:
  BEGIN OF gs_time,
    count             TYPE i,
    sorted_unique     TYPE timestampl,
    sorted_nonunique  TYPE timestampl,
    manual_sort_logic TYPE timestampl,
  END OF gs_time,
  gt_times LIKE TABLE OF gs_time.

TYPES:
  tt_int TYPE TABLE OF i WITH EMPTY KEY,
  BEGIN OF gtys_integer,
    integer TYPE i,
  END OF gtys_integer,
  gtyt_interger                  TYPE TABLE OF gtys_integer WITH EMPTY KEY,
  gtyt_interger_sorted_unique    TYPE SORTED TABLE OF gtys_integer WITH UNIQUE KEY integer,
  gtyt_interger_sorted_nonunique TYPE SORTED TABLE OF gtys_integer WITH NON-UNIQUE KEY integer.

DATA:it_three TYPE tt_int.

DO 13 TIMES.
  DATA(lv_count) = 2 ** sy-index.
  DATA(lt_table1) = VALUE gtyt_interger( FOR count2 = 1 THEN count2 + 1 UNTIL count2 > lv_count ( integer = count2 ) ).
  DATA(lt_table2) = VALUE gtyt_interger( FOR count = lv_count THEN count - 1 UNTIL count = 0 ( integer = count ) ).

  IF sy-index EQ 2.
    cl_demo_output=>begin_section( title = |Sample table| ).
    cl_demo_output=>write_text( text = |All tables follow the same rule:{
                                        cl_abap_char_utilities=>newline }First table: 1 to count{
                                        cl_abap_char_utilities=>newline }Second table: count to 1| ).
    cl_demo_output=>write_data( value = lt_table1 name  = |First Table| ).
    cl_demo_output=>write_data( value = lt_table2 name  = |Second Table| ).
    cl_demo_output=>begin_section( title = 'Time needed' ).
  ENDIF.

* 1. Sorted Non Unique
  GET TIME STAMP FIELD lv_time_first.
  DATA(lt_table4) = CORRESPONDING gtyt_interger_sorted_nonunique( BASE ( lt_table1 ) lt_table2 ).
  GET TIME STAMP FIELD lv_time_second.

* 2. Sorted Unique
  GET TIME STAMP FIELD lv_time_third.

* DISCARDING DUPLICATES can be used with NW7.51 and higher
  DATA(lt_table3) = CORRESPONDING gtyt_interger_sorted_unique( lt_table1 DISCARDING DUPLICATES ).
  lt_table3 = CORRESPONDING #( BASE ( lt_table3 ) lt_table2 DISCARDING DUPLICATES ).
  GET TIME STAMP FIELD lv_time_fourth.

  DATA(it_one) = VALUE tt_int( FOR count2 = 1 THEN count2 + 1 UNTIL count2 > lv_count ( count2 ) ).
  DATA(it_two) = VALUE tt_int( FOR count = lv_count THEN count - 1 UNTIL count = 0 ( CONV #( count ) ) ).

  CLEAR: it_three.
  GET TIME STAMP FIELD lv_time_fifth.
  APPEND LINES OF it_one TO it_three.
  APPEND LINES OF it_two TO it_three.

* 3. Manual Sort Logic
  DATA(lv_len) = lines( it_three ).
  DATA(i) = 1.
  WHILE i < lv_len.
    DATA(lv_min) = it_three[ i ].
    DATA(j) = i + 1.
    WHILE j < lv_len + 1 .
      IF it_three[ j ] < lv_min.
        DATA(lv_temp) = lv_min.
        lv_min = it_three[ j ].
        it_three[ j ] = lv_temp.
      ENDIF.
      j = j + 1.
    ENDWHILE.
    it_three[ i ] = lv_min.
    i = i + 1.
  ENDWHILE.

  GET TIME STAMP FIELD lv_time_sixth.

* Populating the table with the time for the 3 techniques
  gt_times = VALUE #( BASE gt_times ( count = lv_count
                                      sorted_unique = lv_time_fourth - lv_time_third
                                      sorted_nonunique = lv_time_second - lv_time_first
                                      manual_sort_logic = lv_time_sixth - lv_time_fifth ) ).
ENDDO.

cl_demo_output=>write_data( value = gt_times ).
cl_demo_output=>display( ).
Result
Allow us to run and check the time taken for each Sort Calculation
True to form, the Manual Arranging calculation took outstanding time contrasted with the standard punctuation. The SORTED_UNIQUE fared better compared to SORTED_NONUNIQUE. Albeit the time contrast is very tiny yet Arranged One of a kind procedure was reliably better compared to Arranged NON Interesting and with more volume of information, the hole among Special and NON Remarkable would be more noticeable and significant.
Keyword – DISCARDING DUPLICATES
We previously referenced about the new watchword Disposing of in past article. It is accessible from NW7.51. Check beneath, NW 7.4 doesn’t remember it.
SAP Netweaver 740DISCARDING keyword available after NW751
In the event that you really want a reference code bit to populate table with Non One of a kind and Exceptional information, check the underneath program given by Stephan. He has made two inner tables and afterward embedded information of both the tables into one. One of the last table is Arranged One of a kind and the other one is Arranged NON Special. This is a genuine model for everybody to learn present day Sentence structures and be more proficient at their work place.
REPORT zstkoes_sort.
TYPES:
  BEGIN OF gtys_integer,
    integer TYPE i,
  END OF gtys_integer,
  gtyt_interger                  TYPE TABLE OF gtys_integer WITH EMPTY KEY,
  gtyt_interger_sorted_unique    TYPE SORTED TABLE OF gtys_integer WITH UNIQUE KEY integer,
  gtyt_interger_sorted_nonunique TYPE SORTED TABLE OF gtys_integer WITH NON-UNIQUE KEY integer.

DATA(lt_table1) = VALUE gtyt_interger( ( integer = 9 ) ( integer = 1 ) ( integer = 9 ) ).
DATA(lt_table2) = VALUE gtyt_interger( ( integer = 20 ) ( integer = 9 ) ( integer = 4 ) ).

* CORRESPONDING can be used with NW7.40PL2 and higher
DATA(lt_table4) = CORRESPONDING gtyt_interger_sorted_nonunique( BASE ( lt_table1 ) lt_table2 ).

* DISCARDING DUPLICATES can be used with NW7.51 and higher
DATA(lt_table3) = CORRESPONDING gtyt_interger_sorted_unique( lt_table1 DISCARDING DUPLICATES ).
lt_table3 = CORRESPONDING #( BASE ( lt_table3 ) lt_table2 DISCARDING DUPLICATES ).

cl_demo_output=>write_data( value = lt_table1 name  = |First Table| ).
cl_demo_output=>write_data( value = lt_table2 name  = |Second Table| ).
cl_demo_output=>write_data( value = lt_table3 name  = |Sorted Table with unique key| ).
cl_demo_output=>write_data( value = lt_table4 name  = |Sorted Table with non-unique key| ).

cl_demo_output=>display( ).
Compact discs Perspectives work on the code pushdown system where the information concentrated computations/collections are finished in the DB layer (rather than the conventional application layer), which gives a lift to execution. Let’s go in CDS – 23: CDS Performance Analysis – Basics – 1.
Everyones assumption is that with the code pushdown the wizardry ought to happen like clockwork. The presentation ought to continuously be better on the off chance that not advanced. Be that as it may, companions in genuine task situations, everything is certainly not a cheerful way. There have been cases where the inquiry doesn’t give the normal presentation elevate. In this multi-part series, we will initially take a gander at dissecting the exhibition of the basic question and afterward articulate various ways of tuning it.
The web is overflowed with Center Information Administrations, however you will scarcely find any great instructional exercises or series on Advancement and Execution Tuning of ABAP Center Information Administrations. Ideally, this series will help our SAP Brotherhood. CDS – 23: CDS Performance Analysis – Basics – 1.
Basics First.
ABAP Cds sees are created utilizing ADT and their execution occurs in the DB.
Scientific Question Cds act uniquely in contrast to Utilization View Albums due to the hidden comments which influence execution (We will examine this To some degree 2).
It is feasible to investigate Logical Inquiry Discs through exchange RSRT to recognize Fiori or approval related issues. This is one of the initial steps prescribed to segregate and recognize assuming that the issue is execution related.
To comprehend the execution, we really want to distinguish the SQL articulation that is created by the Compact discs. (Here we should give close consideration to the genuine factors and worth that are utilized).
For instance: Execution of Preliminary Equilibrium Albums (IFIGLBALCUBE/I_GLACCTBALANCECUBE) in 1709 produces the accompanying SQL explanation.
You can definitely relax, we will find in the ensuing presents on how on get this SQL explanation.
SELECT /* CDS access control applied */ "COMPANYCODE" "K____360" ,
"CHARTOFACCOUNTS" "K____359" ,
"GLACCOUNT" "K____366" ,
"FISCALPERIODDATE" "K____443" ,
"COMPANYCODECURRENCY" "K____479" ,
COUNT(*) "Z____110_SUM" , SUM( "DEBITAMOUNTINCOCODECRCY" )
"Z____3159_SUM" , SUM( "ENDINGBALANCEAMTINCOCODECRCY" )
"Z____3163_SUM" , SUM( "CREDITAMOUNTINCOCODECRCY" )
"Z____3187_SUM"
FROM /* Entity name: I_GLACCTBALANCECUBE CDS access controlled */
"IFIGLBALCUBE" ( "P_FROMPOSTINGDATE" => ? , "P_TOPOSTINGDATE" => ? )
"A1" WHERE "MANDT" = ? AND "COMPANYCODE" = ? AND
"LEDGER" = ? GROUP BY "COMPANYCODE" , "CHARTOFACCOUNTS" ,
"GLACCOUNT" , "FISCALPERIODDATE" ,
"COMPANYCODECURRENCY" ORDER BY "A1" . "COMPANYCODE" , "A1" .
"GLACCOUNT"  WITH HINT
(DOUBLE_PREAGGR_BEFORE_JOIN,USE_OLAP_PLAN,RESULT_LAG ('hana_long'))
WITH RANGE_RESTRICTION('CURRENT')
In the event that the Compact discs view has approval limitations through DCL (Information Control Language) this will have an essential impact in the SQL explanation framed. In the past proclamation, “Cds access control” shows that a relating DCL exists and approval limitations have been applied during execution.
In the event that Compact discs question has DB hints (prev model has HINT(DOUBLE_PREAGGR_BEFORE_JOIN,USE_OLAP_PLAN,RESULT_LAG (‘hana_long’))) as a feature of the explanations, this will likewise have an impact in the execution plan(creation of the SQL proclamation) of the Cds.
Cds sees work on a stacking model. (Sees are stacked and reused to accomplish more prominent adaptability and strength). On the off chance that the stacking is poor, this will be a channel on the presentation.
How to understand the stacking model?
In ADT, subsequent to opening the connected Discs view, right snap and pick
Open With -> Dependency Analyzer.
This will open the SQL Reliance Tree which shows how the choice occurs starting from the top
Really focus on the Tabs at the lower part of the screen.
SQL Dependency Graph is a visual portrayal of the Tree and assists you with better grasping the information base choice. (This is a decent device to use to eliminate any undesirable branches from the SQL question to upgrade the presentation).
Complexity Metrics give an obvious sign of the quantity of data set tables utilized by the Discs view. (kindly note that runtime affiliations are excluded from this rundown just plan time affiliations, joins, associations, collections and so on.)
This gives a fundamental thought on how Discs view work in the engine and what are the significant contemplations that influence execution. In the accompanying posts, we will take a gander at the SQL explanation, Plan Viz, Execution Plan and Comments to tweak and accomplish ideal execution.
This is only a hint of something larger. We will jump all the more profound to get better understanding of the Cds Execution Tuning. Kindly stay tuned.


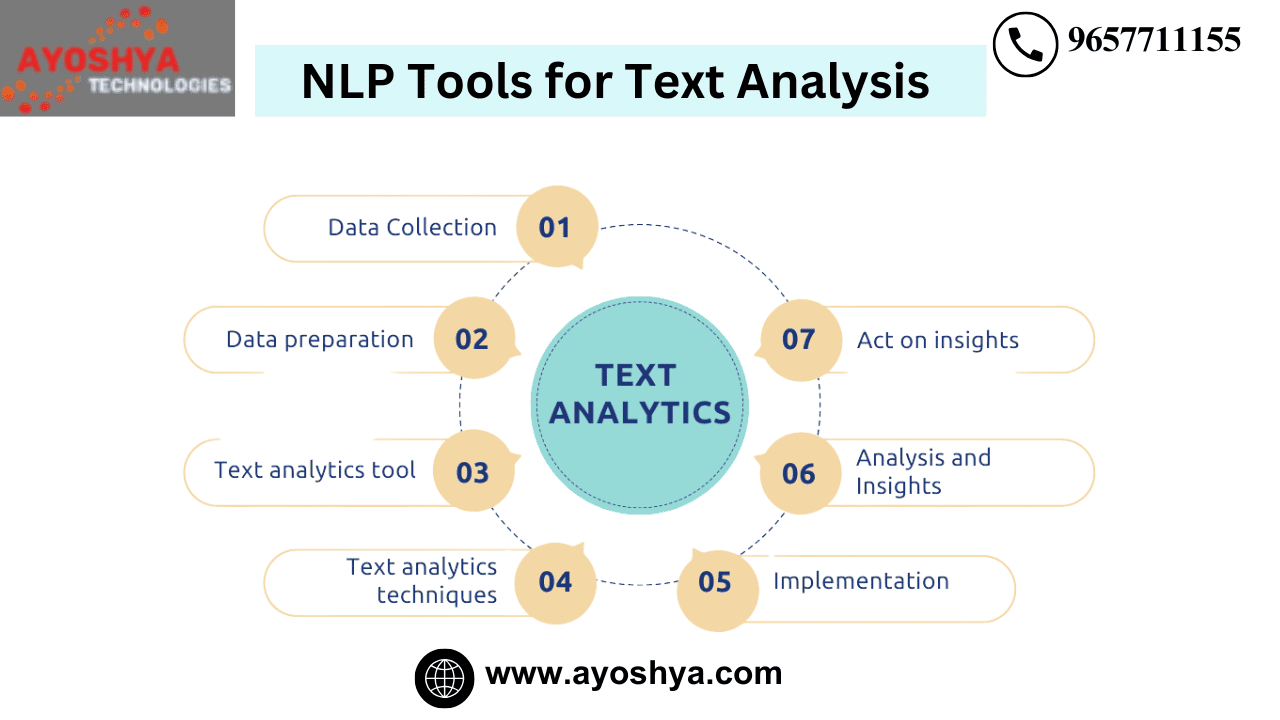


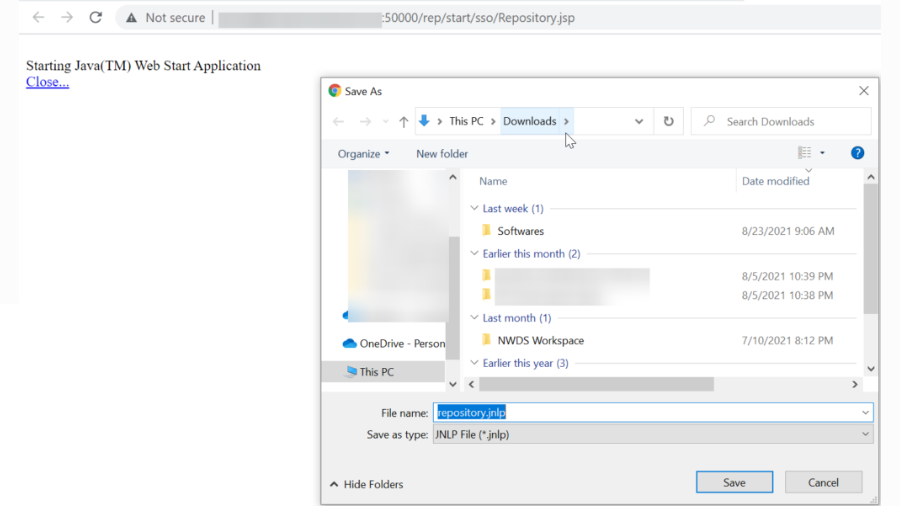
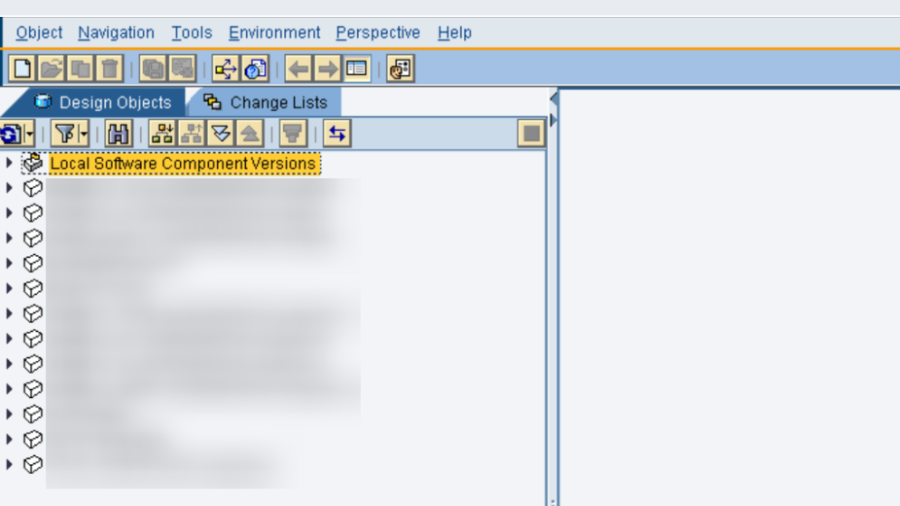
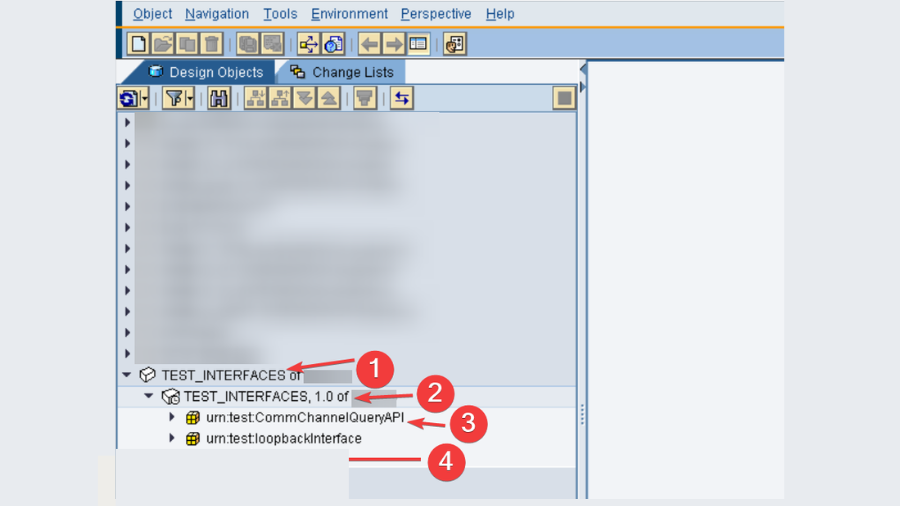
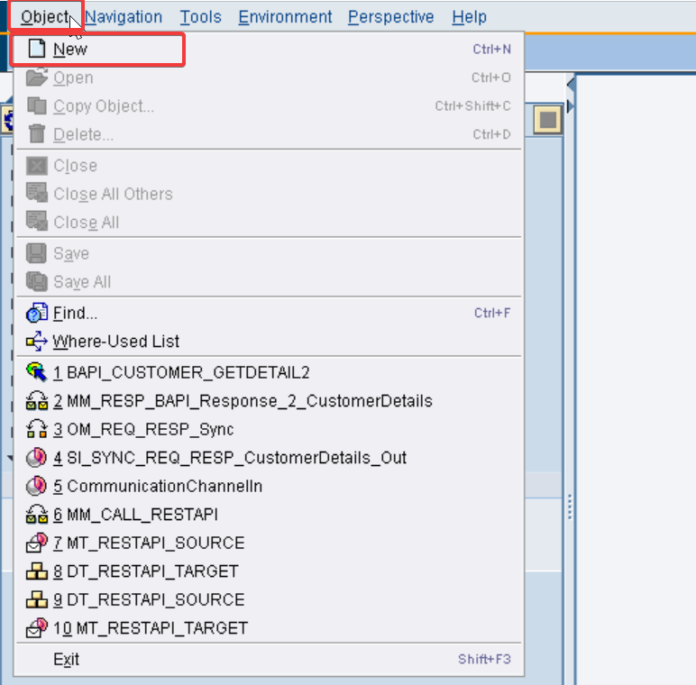
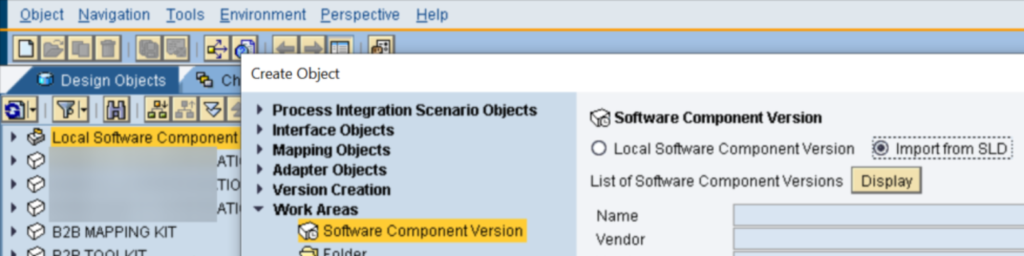

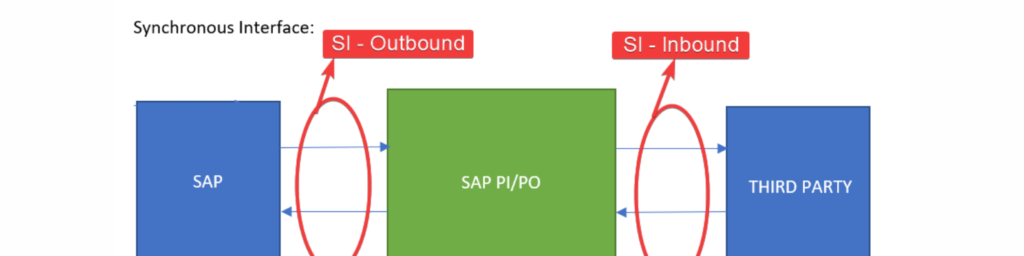
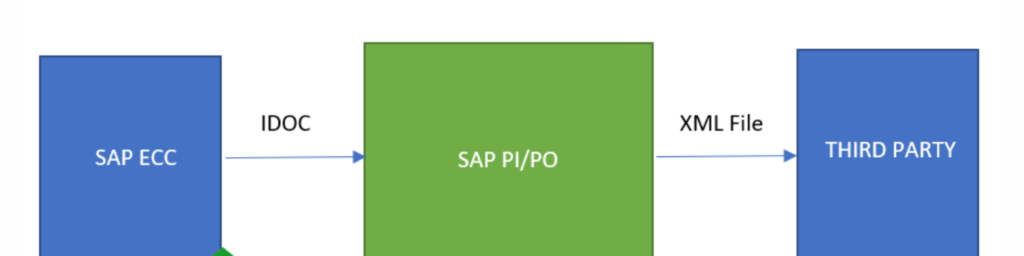

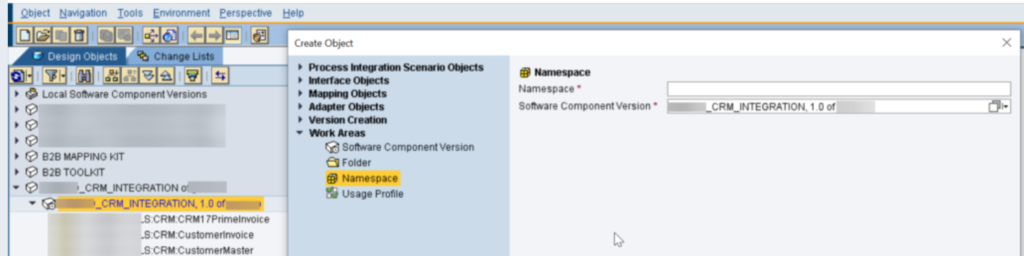
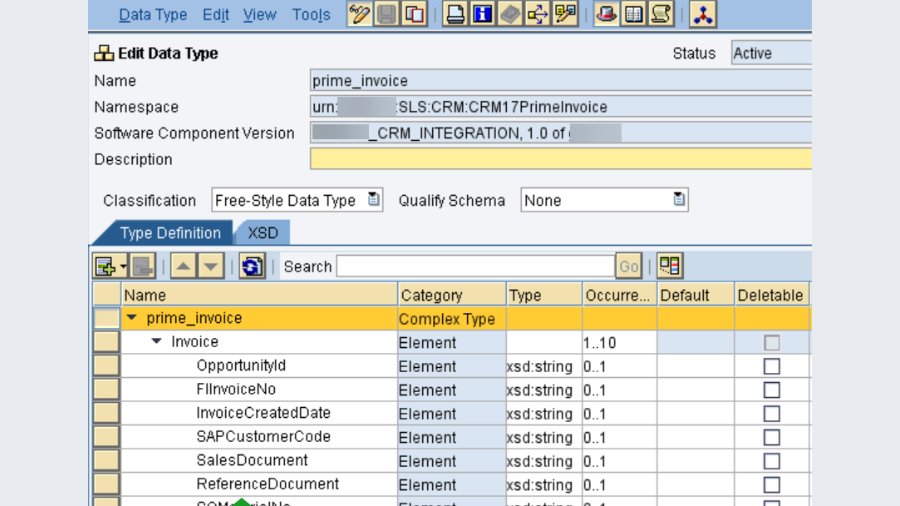
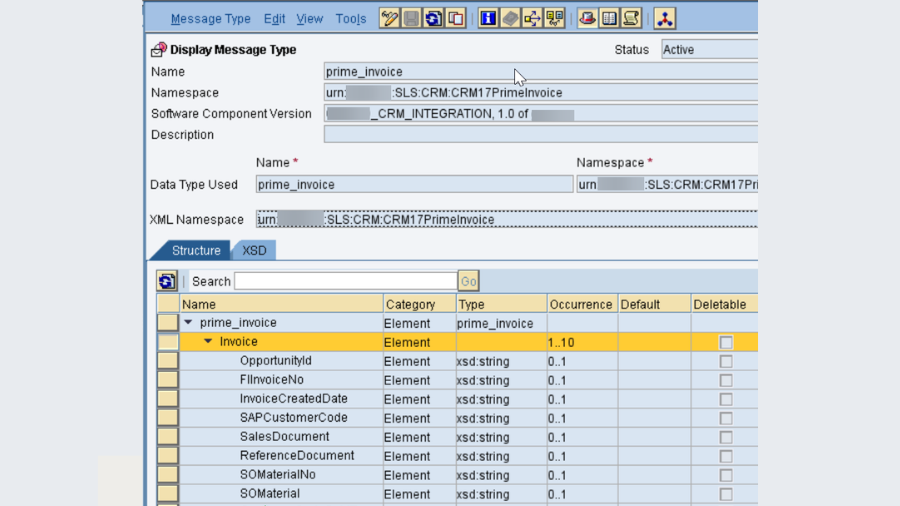
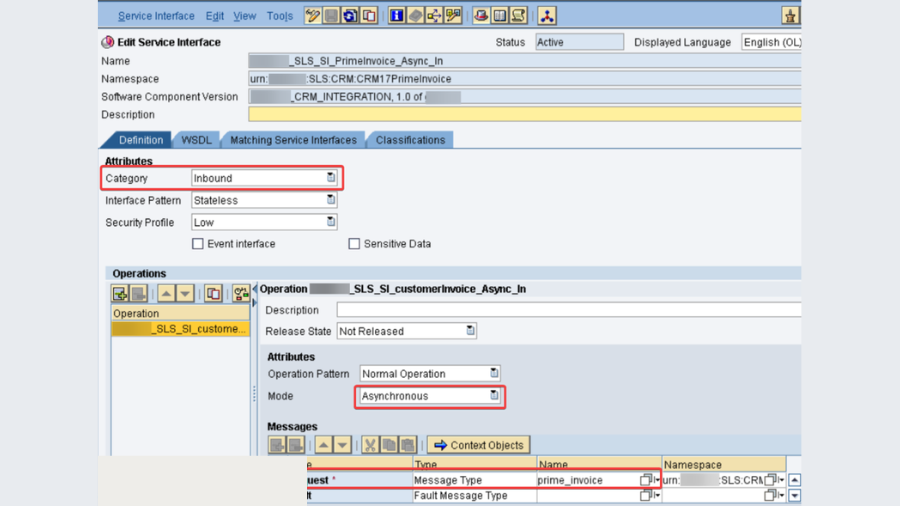
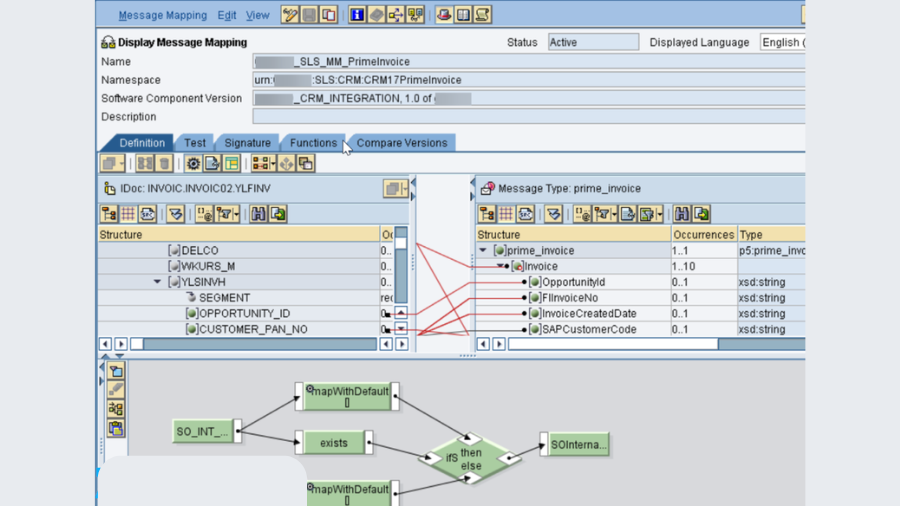
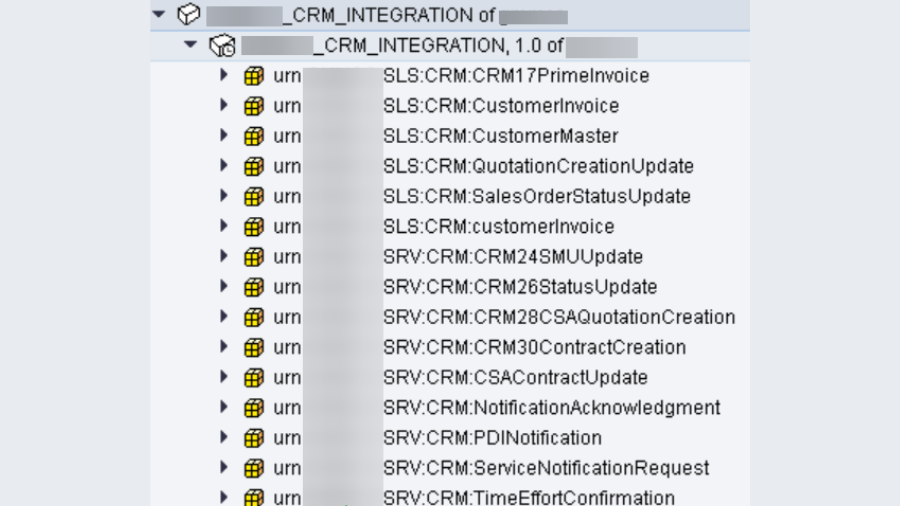
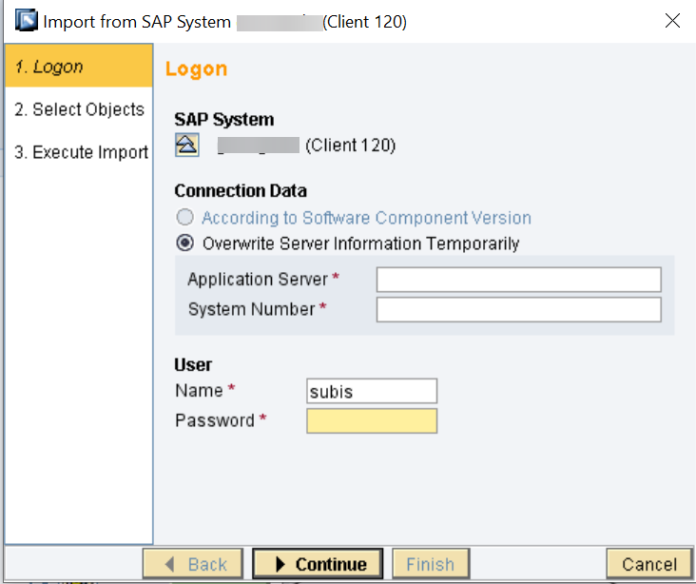
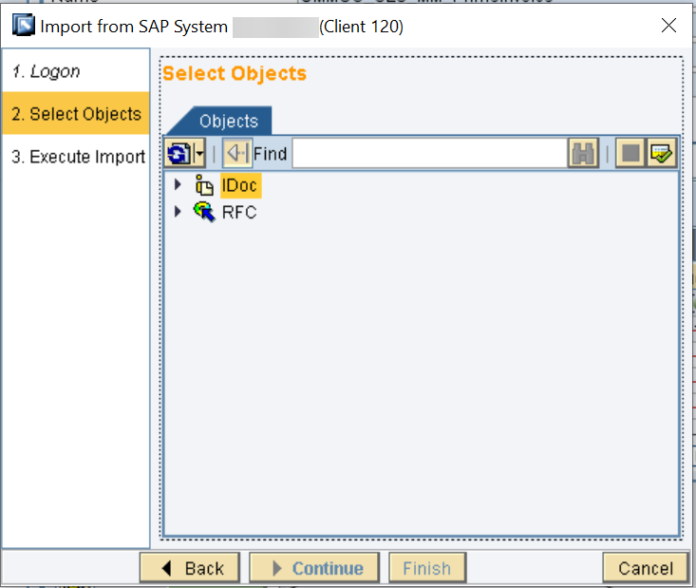
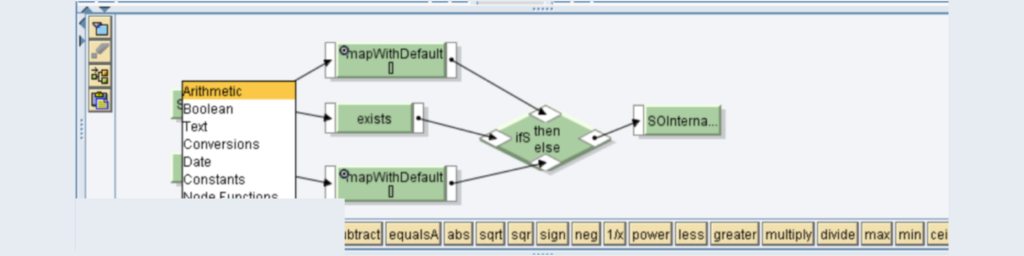
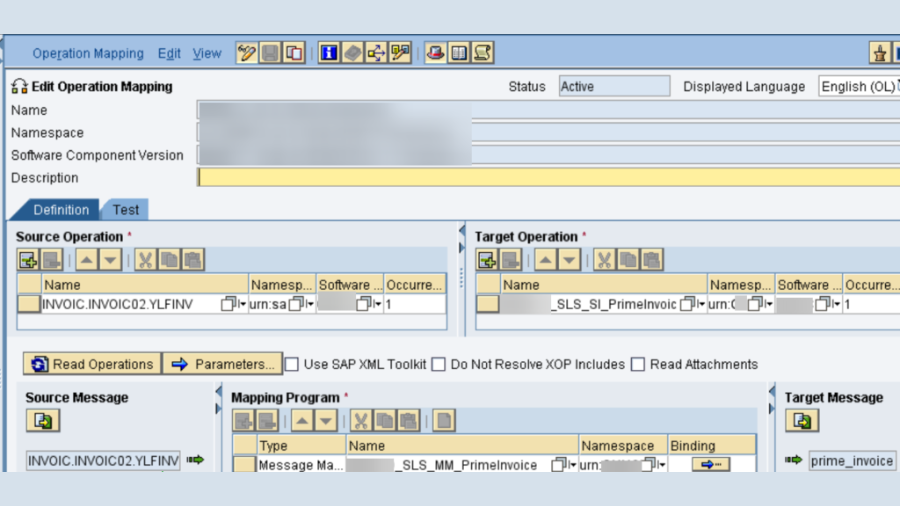

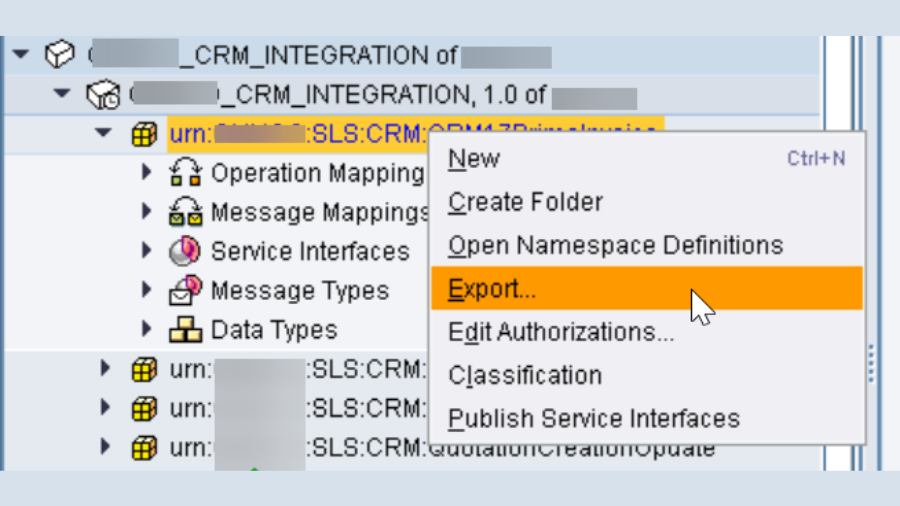
 Select “Transport utilizing Record Framework” and snap on Proceed. Select the namespaces (namespaces incorporates objects we made) which you need to product and snap on FINISH. A TPZ expansion document will be downloaded to your framework.