


How to SPLIT Data in FOR LOOP Using Modern ABAP Syntax?
Before showing How to SPLIT Data in FOR LOOP Using Modern ABAP Syntax? SAP ABAP Designers are know all about Circle — ENDLOOP sentence structure. FOR Circle is moderately new to ABAPers; however, other programming language use it generally. Each engineer has seen this linguistic structure in some or other programming language: for (i=1; i<=3; i++). How could ABAP remain behind?
Whatever the case, previous habits are still present. It is difficult for the slow engineers who were accustomed to standard ABAP programming to use the new punctuation. Today’s article will look at one need that we can definitely meet with the old ABAP, but the new punctuation calls for some help.
The question we asked in our SAP Specialized Wire Gathering and How to SPLIT Data in FOR LOOP Using Modern ABAP Syntax is the result of this post once more. Wesley Massini, one of our real, vibrant, and helpful people, had a program in which he was reading data from a document of a set length. It went perfectly and without any problems. In any case, the document information is no longer fixed once the company decided to separate the content using the highlight “_” later on. At the delimiter highlight, they must separate the data into portions. This delimiter can be anything, such as a pipe (|), tilds (~), or comma (,).
You can also read for:- Transport ABAP Report Variants into a Work Bench Request
Sounds a simple necessity right? Be that as it may, could you at any point do utilizing the new ABAP Sentence structure?
Existing Code for Fixed Length Data
The data in the file would look like this:

It is a document with heterogeneous information. The information in the primary column and second line are unique. For instance, the initial two fields (yellow and blue) in both the columns are Plant and Material. Yet, the third field in red is Seller is first column and keeping in mind that it is a marker in second line. Comparatively fourth field in green is a custom sort in first column and some classification in second line. The thought is, every one of the information columns in the document for type initially ought to go to one inner table and all lines like that of second sort ought to go into another interior table.
We involved SWITCH articulation in new language structure and isolated the columns in view of the length of the information in the document (which is fixed). Column type one has 26 characters while line type two has 18 characters. Likewise, we don’t have to show the augmentation .txt.

As creator and ABAPer Paul Solid says, Compact discs is ABAP in Steriods. We say, not just Compact discs, the new ABAP itself seems to be really dynamic ABAP.
Check the above screen capture. We have In-line information statement, utilization of Significant worth, FOR Circle in inside table, SWITCH and #. Do a F4 on every one of these catchphrases and attempt to figure out the idea.
For our case, we have know the Sort, consequently they come after the Worth administrator. Additionally after SWITCH there is #. The table sorts are announced like underneath.

In order to display the output, we can write the below syntax.

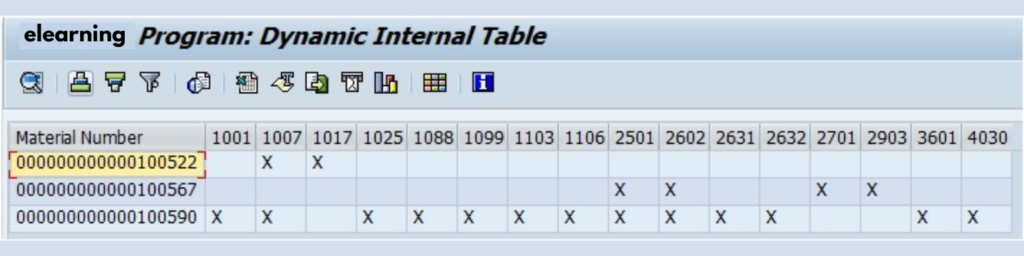
Output

How to Handle Blank Rows?
We are don’t know, how to keep away from the clear lines in both the tables utilizing the cutting edge punctuation. We utilized an Erase proclamation expressly after the information was populated in the inward tables.
Assuming you know how to eliminate the clear lines in the FOR Circle with SWITCH, kindly give the arrangement in the remarks segment. We will refresh this article with your answer.
* Delete Blank Lines
DELETE it_vm_data_tab WHERE werks IS INITIAL.
DELETE it_pm_data_tab WHERE werks IS INITIAL.
New Requirement
Prior our document was fixed length. With the business change, we began getting document with a delimiter highlight ““. In this way, we didn’t have to stress over the length of each fields. Once more, be that as it may, we battled to sort out the most ideal way to Part at “” utilizing new ABAP.

Solution 1
After some examination and with our new information, we accomplished the usefulness utilizing STRLEN, SUBSTRING_BEFORE, SUBSTRING_AFTER , sub, occ string capabilities alongside the Worth and FOR Circle and COND watchwords.

Note: The catchphrase occ is for Event. You could see a negative number for occ = – 1. In the event that occ is positive worth, the events are counted from the left while in the event that occ is a negative number, it is counted from the right side.
Correspondingly check the watchword sub. It is for Substring. Sub searches for the characters in the string.
DATA  result TYPE string.
result = substring( val = 'ABCDEFGH' off = 2 len = 2 ).
result = substring_from( val = 'ABCDEFGH' sub = 'CD' ).
result = substring_after( val = 'ABCDEFGH' sub = 'CD' ).
result = substring_before( val = 'ABCDEFGH' sub = 'CD' ).
result = substring_to( val = 'ABCDEFGH' sub = 'CD' ).
The above bit is from SAP Help to show the utilization of SUB and different SUBSTRING capabilities. The result for each outcome is “Disc”, “CDEFGH”, “EFGH”, “Stomach muscle”, and “ABCD” in a similar request.
The above code likewise gave a clear line and we had to unequivocally utilize the Erase explanation. Likewise, we had COND in the grammar which could be stayed away from. We accomplished the business necessity, yet we were all the while contemplating whether there is a superior method for accomplishing it. Without the Erase articulation and COND. Also, prepare to be blown away. Stephan gave a faultless arrangement once more!!
Solution 2 from Stephan
Stephan prescribed to place an identifier in the start of the information line for the document. For our case, it is VM and PM. Additionally, with his new arrangement rationale there is compelling reason need to utilize COND.


Actually take a look at the arrangement above. He has utilized WHERE condition in the FOR Circle. There is no requirement for WHEN and afterward. Additionally, the STRLEN check of each column is forestalled alongside COND #.
Code Snippet
* Types Declaration
TYPES:
  BEGIN OF ty_vm_file,
    werks TYPE werks_d,
    matnr TYPE matnr,
    lifnr TYPE lifnr,
    ztype TYPE char1,
  END OF ty_vm_file,

  BEGIN OF ty_pm_file,
    werks TYPE werks_d,
    matnr TYPE matnr,
    htype TYPE char1,
    zcagn TYPE char2,
  END OF ty_pm_file,

  BEGIN OF ty_filename,
    filename TYPE text1024,
  END OF ty_filename,

* Table Type declaration
  tt_vm_tab       TYPE TABLE OF ty_vm_file WITH EMPTY KEY,
  tt_pm_tab       TYPE TABLE OF ty_pm_file WITH EMPTY KEY,
  tt_filename_tab TYPE TABLE OF ty_filename WITH EMPTY KEY.

* My recommendation is to put an identifier at the beginning of the filename like in this sample.
* With this logic there is no need for usage of COND like in the first sample.
DATA(it_fillename_data_tab) = VALUE tt_filename_tab( ( filename = 'VM_CA02_0074203_0000102207_H.txt' )
                                 ( filename = 'PM_CA02_0074203_C_HA.txt' ) ).

DATA(it_vm_data_tab) = VALUE tt_vm_tab( FOR ls_filename IN it_fillename_data_tab
                            WHERE ( filename(3) EQ 'VM_' )
                            ( werks = substring_after( val = substring_before( val = ls_filename-filename sub = '_' occ = 2 ) sub = '_' occ = 1 )
                              matnr = substring_after( val = substring_before( val = ls_filename-filename sub = '_' occ = 3 ) sub = '_' occ = 2 )
                              lifnr = substring_after( val = substring_before( val = ls_filename-filename sub = '_' occ = 4 ) sub = '_' occ = 3 )
                              ztype = substring_after( val = substring_before( val = ls_filename-filename sub = '.' occ = -1 ) sub = '_' occ = -1 )
                                               ) ).

DATA(it_pm_data_tab) = VALUE tt_pm_tab( FOR ls_filename IN it_fillename_data_tab
                       WHERE ( filename(3) EQ 'PM_' )
                               ( werks = substring_after( val = substring_before( val = ls_filename-filename sub = '_' occ = 2 ) sub = '_' occ = 1 )
                                 matnr = substring_after( val = substring_before( val = ls_filename-filename sub = '_' occ = 3 ) sub = '_' occ = 2 )
                                 htype = substring_after( val = substring_before( val = ls_filename-filename sub = '_' occ = 4 ) sub = '_' occ = 3 )
                                 zcagn = substring_after( val = substring_before( val = ls_filename-filename sub = '.' occ = -1 ) sub = '_' occ = -1 )
                                                                          ) ).
* Add both table data for display
cl_demo_output=>write_data( it_vm_data_tab ).
cl_demo_output=>write_data( it_pm_data_tab ).
** Show the output
cl_demo_output=>display( ).
YOU MAY BE INTERESTED IN
The World of ABAP Consultants: Unlocking the Power of SAP
Cracking the Code: Your Earning Potential as a SAP ABAP Developer with 5 Years of Experience