SAP & Oracle partner and support companies

Loading

SAP

Why are developers so fond of ‘REUSE_ALV_GRID_DISPLAY’?

Is it that hard to NOT utilize FM ‘REUSE_ALV_GRID_DISPLAY’ to show ALV? Or on the other hand is it human instinct to remain in our usual range of familiarity? ABAPers who are dependent on this FM, have the code scrap prepared in their vault to reuse in each and every other report, so they don’t really focus to look on some other option.

SAP delivered the class ‘CL_SALV_TABLE’ over 10 years prior yet it couldn’t arrive at the personalities of the vast majority of those FM cherishing ABAPers. SAP has different classes to show the ALV however plant strategy is one of the least difficult to execute. Truth be told, I find manufacturing plant strategy takes even less lines of code than the famous ‘REUSE_ALV_GRID_DISPLAY’.

Web is overwhelmed with instructional exercises of how to involve this class ‘CL_SALV_TABLE’ for ALV show. So I would rather not add another instructional exercise. Here, I would just give the functioning code scrap which can be utilized in any task. Trust with this instant arrangement, some old fashioned ABAPers would take a dunk in this class strategy to show the ALV..

Pronounce a technique in your report class with the underneath code passing your last inward table ( for fledgling you can duplicate it into a subroutine and call it in your program).

Save this code scrap and begin reusing it with certainty..

Strategy display_alv_report .

DATA:
lr_alv TYPE REF TO cl_salv_table,
lr_columns TYPE REF TO cl_salv_columns_table,
lr_column TYPE REF TO cl_salv_column,
lr_functions TYPE REF TO cl_salv_functions_list,
lr_display TYPE REF TO cl_salv_display_settings,
lr_layout TYPE REF TO cl_salv_layout,
lr_sorts TYPE REF TO cl_salv_sorts,
ls_key TYPE salv_s_layout_key.

* Check to make sure the internal table has data.
IF lines( it_final ) > 0.

TRY.
* Create ALV instance
* This is the factory method we were talking about
CALL METHOD cl_salv_table=>factory
IMPORTING
r_salv_table = lr_alv
CHANGING
t_table = it_final.

* Get functions object
lr_functions = lr_alv->get_functions( ).

* Set all the functions
lr_functions->set_all( ).

* Get column object
lr_columns = lr_alv->get_columns( ).

* These are optional functions
* If you want to change the description of columns, call and set as shown below
* CALL METHOD lr_columns->get_column
* EXPORTING
* columnname = 'NETWR_PO'
* RECEIVING
* value = lr_column.

* Important to mention. If you want to give custom short text, then make
* Medium text and long text blank (important trick). Similarly applicable for med and long text overriding.
* CALL METHOD lr_column->set_short_text
* EXPORTING
* value = ' '.
* CALL METHOD lr_column->set_medium_text
* EXPORTING
* value = 'PO Srv Net Val'.
* CALL METHOD lr_column->set_long_text
* EXPORTING
* value = ' '.
*
* Optimize the columns
* lr_columns->set_optimize( ).

* Get sort column
* lr_sorts = lr_alv->get_sorts( ).
* lr_sorts->clear( ).

* Sort table
* lr_sorts->add_sort( columnname = 'AUFNR' ).

* Get Layout
lr_layout = lr_alv->get_layout( ).

ls_key-report = sy-repid.
* Set Layout
lr_layout->set_key( ls_key ).
lr_layout->set_default( ' ' ).
lr_layout->set_save_restriction( cl_salv_layout=>restrict_none ).

* Optional, if there is a layout from selection screen use it
* IF NOT p_layout IS INITIAL.
* lr_layout->set_initial_layout( p_layout ).
* ENDIF.

* Get Display setting
lr_display = lr_alv->get_display_settings( ).

lr_display->set_striped_pattern( cl_salv_display_settings=>true ).

* Display the ALV
lr_alv->display( ).

* Catch exceptions
CATCH cx_salv_msg.
WRITE: 'Error displaying grid CX_SALV_MSG!'.

CATCH cx_salv_not_found.
WRITE: 'Error displaying grid CX_SALV_NOT_FOUND!'.

CATCH cx_salv_data_error.
WRITE: 'Error displaying grid CX_SALV_DATA_ERROR!'.

CATCH cx_salv_existing.
WRITE: 'Error displaying grid CX_SALV_EXISTING!'.

ENDTRY.

ELSE.

WRITE: 'There is no data to display!'.

ENDIF.

ENDMETHOD. " DISPLAY_ALV_REPORT

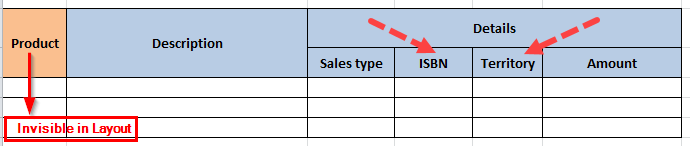
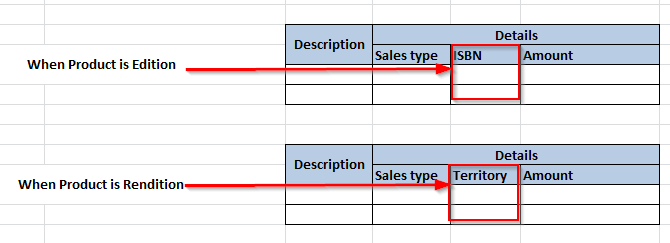
If you do not want to display certain fields of the final table, we can set it to invisible.

Hide some fields or make them Invisible.

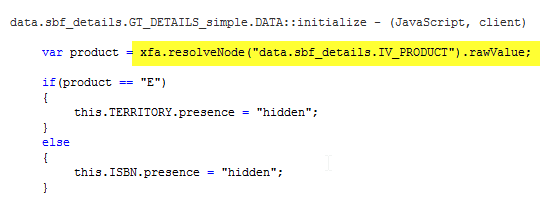
lr_column->set_visible( value if_salv_c_bool_sap=>false ).

Or

CALL METHOD lr_column->set_visible
EXPORTING
value = if_salv_c_bool_sap=>false.

Updated 12/26/2018

To put header data on top of the ALV, you can utilize the underneath piece.

Underneath capability would put the header.

lr_alv->set_top_of_list( lr_content ).

Check the reference snippet to build the header content.

*&---------------------------------------------------------------------*
*&      Form  built_header
*&---------------------------------------------------------------------*
FORM built_header CHANGING cr_content TYPE REF TO cl_salv_form_element.

  DATA: lr_grid   TYPE REF TO cl_salv_form_layout_grid,
        lv_row    TYPE i,
        lv_fdate  TYPE char10,
        lv_tdate  TYPE char10,
        lwa_error TYPE ty_error,
        lv_head   TYPE string VALUE 'Report of Dunned Accounts with No POSID',
        lv_text   TYPE string,
        lr_grid_1 TYPE REF TO cl_salv_form_layout_grid,
        lr_text   TYPE REF TO cl_salv_form_text,
        lr_label  TYPE REF TO cl_salv_form_label.

  lv_row = lines( it_error ).

  lv_row = lv_row + 2.

  CREATE OBJECT lr_grid.

  lr_grid->create_header_information(
    row    = 1
    column = 1
    text    = lv_head
    tooltip = lv_head ).

  lr_grid->add_row( ).

  lr_grid_1 = lr_grid->create_grid( row    = lv_row
                                          column = 1 ).

  lr_label =  lr_grid_1->create_label(
                      row     = 1
                      column  = 1
                      text    = 'Dunning Run Date:'(015)
                      tooltip = 'Dunning Run Date:'(015) ).

  IF s_id IS NOT INITIAL.

    lr_label =  lr_grid_1->create_label(
                      row     = 2
                      column  = 1
                      text    = 'Dunning Run ID:'(016)
                      tooltip = 'Dunning Run ID:'(016) ).
  ENDIF.

  CLEAR lv_text.

  IF s_date-high IS NOT INITIAL.
    WRITE s_date-low TO lv_fdate.
    WRITE s_date-high TO lv_tdate.
    CONCATENATE lv_fdate 'to' lv_tdate INTO lv_text SEPARATED BY space.
  ELSE.
    WRITE s_date-low TO lv_fdate.
    lv_text = lv_fdate.
  ENDIF.


  lr_text = lr_grid_1->create_text(
                    row     = 1
                    column  = 2
                    text    = lv_text    " s_date-low
                    tooltip = lv_text ). " s_date ).

  CLEAR lv_text.

  IF s_id IS NOT INITIAL.
    IF s_id-high IS NOT INITIAL.
      CONCATENATE s_id-low 'to' s_id-high INTO lv_text SEPARATED BY space.
    ELSE.
      lv_text = s_id-low.
    ENDIF.

    lr_text = lr_grid_1->create_text(
                      row     = 2
                      column  = 2
                      text    = lv_text      " s_id-low
                      tooltip = lv_text ).   "s_id ).

  ENDIF.

  CLEAR lv_row.
  lv_row = 2.
  LOOP AT it_error INTO lwa_error.
    lv_row = lv_row + 1.

    lr_label =  lr_grid_1->create_label(
                      row     = lv_row
                      column  = 1
                      text    = 'Dunning Lock Error:'(017)
                      tooltip = 'Dunning Lock Error:'(017) ).

    lr_text = lr_grid_1->create_text(
                      row     = lv_row
                      column  = 2
                      text    = lwa_error-message
                      tooltip = lwa_error-message ).
  ENDLOOP.

  lr_label->set_label_for( lr_text ).

  cr_content = lr_grid.

ENDFORM.                    " built_header

Kindly let us know, assuming we want to give further explanation on this subject.

YOU MAY LIKE THIS

Comprehensive Blog Series on ABAP on Cloud

Business Object Processing Framework (BOPF)

SAP Business Workflow

SAP ABAP Interview Questions Real time Expectations

Proxy in SAP Abap: Seamless Communication

SAP

Is data element WDY_BOOLEAN and Flag (Char1) same for Web Dynpro ALV?

Both wdy_boolean and flag are data elements of type char1.  Does it mean both are same?

Straight talk today. Allow me to show both of the results of a similar Web Dynpro ALV which has three fields, to make my point. Three sections in an ALV are: Plant, Plant Name and a one-person banner saying ‘Set’.

a) Let us initially characterize the information component as ‘Banner for the one-person field ‘Set’ in the setting definition. Check out at the result in ALV.

2
3

b) Presently, let us characterize the information component as WDY_BOOLEAN for a similar one-person field ‘Set’. Mark the result ALV once more.

4
52

Do you see the distinction?
The subsequent result shows that the “Set” field is shown as a checkbox.

Did it light something?
Thus, at whatever point you really want a checkbox in an intelligent ALV, just set the field as WDY_BOOLEAN, and you are good to go to get a checkbox as a result. Isn’t it cool?

Kindly leave your message below, and we would be glad to answer.

To get such down-to-earth issues and goals directly to your inbox, kindly buy in. We regard your security and view safeguarding it in a serious way.

On the off chance that you enjoyed this post, if it’s not too much trouble, hit the offer button at the left half of your screen.

Many thanks for your time!!

YOU MAY LIKE THIS

Unsupervised Learning in 2024: Unveiling the Hidden Gems of Your Data

Can I become full stack developer in 3 months?

AI and Machine Learning in SAP: A Practical Guide

Leveraging SAP HANA for Advanced Analytics

SAP

Adobe Interactive Forms. Part 23. How to Hide the Fields and Acquired Space Dynamically using JavaScript in Adobe Form

PREQ: Should be aware of basics of Adobe Form.

Transaction code: SFP

Enter the interface name and click on create.

Enter the description and save it.

Create the custom importing parameters variables by clicking the import button on the left side and click on create button on right side and save and activate it. We have declared three parameters of same type of CHAR20.

Now go back to the main screen of SFP and choose the option Form and create it by adding the interface which we had created previously.

On the left side expand import section of interface and drag and drop all the importing variables IV_NAME1, IV_NAME2 and IV_NAME3 to context.

Let’s create the Layout of form which is available next to Context button.

Switch to design view and click on Hierarchy part. Select the content area of a form and click on object (right side) after that click on Subform and choose content type: Flowed

Now here we will design the form using Subform and wrap every object like text fields, text box, Buttons and tables etc. in it.

Here we will create 4 Subforms in content area.

Now select the Subform and inert the text fields and rename the default name of Text Fields to:

Name1, Name2 and Name3


Do the binding of all three text fields from the importing parameter variables (IV_NAME1, IV_NAME2 and IV_NAME3) by clicking on the the binding > Data Binding > choose the field

After the we will hide the field Name2 of subform2 using JavaScript. Select the subform2 and go to Palettes > Script Editor

You will get the below screen

Choose the event Initialize and language JavaScript and write the below code.

if( this.Name2.rawValue == null )

{              this.presence = ‘hidden’

}

We are hiding the field Name2 if its empty.

Always use the same field name (Name2) in script which is defined in the subform and it’s a case sensitive also otherwise it won’t work.

Check save and activate it.

Let’s test our form.

Case 1: Press F8 and pass all the importing values.

Press F8 and press on print preview.

Here script won’t hide Name2 as have passed the value in IV_NAME2. 

Case 2:  IV_NAME2 =   ‘ ‘.

Press F8 and don’t pass the value in IV_NAME2.

This time JavaScript code gets executed to hide the field Name2 and removed the space also.

If you see below fields has shifted to up and adjusted the space automatically. This is only possible if you wrap the fields in Subform. 

Hope you were able to get a fair idea about this interesting topic. If you have any doubts, queries or suggestions for us, please put your comments below. I will be happy to respond you.

YOU MAY LIKE THIS

SAP ABAP Checkpoint Group – Chase the Mysterious SAP Issues with a Smile

Best Practices for SAP ABAP Development: A Comprehensive Guide

4 Useful Tips on ABAP and ABAP on HANA

SAP

SAP Interactive Adobe Forms. Part 22. Handle Different Paper Size templates into single Adobe Form

SAP Adobe is still a niche area. With S/4HANA eventually almost all forms will be converted to Adobe. So, if you have not started learning SAP Adobe, it is high time you did it. Put this in your new year resolutions. 

This article presents an intriguing method for combining different paper sizes into a single format. While most other countries use A4 paper size, we have a legal need for US-based countries to use LETTER paper size in various roll-outs for different countries. In order to meet this need, we typically need to maintain multiple forms and design two distinct  templates, one for the US and one for the other countries.Having a single Global Form Template that works for  both A4 and letter sizes would be very beneficial.

SAP HANA ABAP Programming

Before we move forward with this tutorial, we have a quick announcement to make. A new batch of ABAP Programming on SAP HANA is commencing on 18th Jan 2020. If ABAP on HANA is in your kitty list, do take a look into the course content and enroll for the same.

Steps to create Template:

  • Create Adobe form with 2 master Pages – LetterMaster and A4Master
Hierarchy of Adobe Form with 2 master Pages
  • Set Paper Type of LetterMaster page as ‘LETTER’

Go to Object Palette->Select “Master page” tab->Select ‘paper type” as Letter

  • Set paper Type of A4Master page as ‘A4’.

Go to Object Palette->Select “Master page” tab->Select ‘paper type” as A4

  • Create 2 body pages – LetterDetails and A4Details and create a text field in each body page

If we try to generate output with this template, we would see 2 pages. But our business requirement is to show only one page – either Letter or A4.

How can we achieve it? A conditional flag can come to our rescue.

For that, we have to declare a flag containing identifier for both paper sizes and based on that flag, we have to hide/ display the relevant pages.

  • Declare an import parameter in Form interface as IV_PAPER_TYPE with type BOOLEAN.
  • In Driver program, we have to pass the value of the above flag as :

When LETTER is needed, set IV_PAPER_TYPE = ‘X’

When A4 is needed, set IV_PAPER_TYPE = ‘-‘

  • Drag and drop the import parameter From Interface to Form Context.
  • On LetterDetails Page, add the following Java script in INITIALIZATION event to hide the LetterDetails page based on flag value relevant to A4:
 if( $record.FLAGS_DYNAMIC_CONTENT.IV_PAPERTYPE_FLAG.value == "-" )
 {
 	this.presence = "hidden";
 }
  • On A4Details Page, add the following Java script in INITIALIZATION event to hide the A4Details page based on flag value relevant to LETTER :
  if( $record.FLAGS_DYNAMIC_CONTENT.IV_PAPERTYPE_FLAG.value == "X" )
 {
 	this.presence = "hidden";
 }

Here is the Main Trick

We need to link the Body pages with the respective Master pages so that when Form processing runs, Life Cycle Designer should trigger the correct page.

  • Set the pagination of LetterDetails page with LetterMaster page
Select required page from drop-down list in “Place”
  • Set the pagination of A4Details page with A4Master page
Select required page from drop-down list in “Place”

Testing :

Execute the driver program and set the Paper Size as LETTER

Execute the driver program and set the Paper Size as A4

I hope you’ll be able to apply this tip to your project at some point. This tip is useful if your organization operates globally using a single SAP system. It’s not necessary to make duplicate forms. All of your templates can be used with a single form. We used two templates in this example, but you can use more than two.

YOU MAY LIKE THIS

SAP ABAP Checkpoint Group – Chase the Mysterious SAP Issues with a Smile

Best Practices for SAP ABAP Development: A Comprehensive Guide

4 Useful Tips on ABAP and ABAP on HANA

SAP

Adobe Forms. Part 21. Display Rich Texts from UI App on Adobe Forms

SAP One technology that merits greater recolonization than it currently receives is Adobe Form. You can use Adobe to accomplish any demand you can think of. The use of Adobe Forms’ Rich Texts Integration will be demonstrated in this article. To put it briefly, the Adobe Form should be dynamic in order to carry out one or more of the following tasks using texts:

  1. Can be hard coded in the form, 
  2. Can be maintained in a standard text in SAP and displayed in forms using include texts
  3. Maintain in a UI App with required formatting (Font type-Bold, Italic / different Headings / Bullet points/Numbering) and integrate on Adobe Form.

The first two are easy to understand. According to SAPYard, it is putting something that is not easily found online. Thus, we will focus on point 3.

Prerequisites:

  • Basic familiarity with Java scripts and Adobe forms.
  • fundamental understanding of SAPUI5 and Web Dynpro ABAP (to construct a FormattedText Editor).
  • comprehension of XSLT conversion.
  • strong ABAP knowledge.

Business requirement:

In output forms (AR Correspondences / FSCM Dunning Letters / Billing Invoices etc.), there are lot of text information which is customized based on company code or output types. Business would be interested to maintain these texts outside the Form with desired formatting so that in future, if any related texts need to be changed, business can maintain by themselves and would be updated in forms without doing any form enhancements.

Solution Design:

Implementation Steps:

Make a custom SAPUI5 or Web Dynpro application (you can choose) with the following buttons to  change and save the text in the database, formattedTextEdit UI element, and selection fields:

FormattedText Editor in WD ABAP

FormattedText Editor in SAPUI5

  • Create a Data Base table ZPB_TEXT_HTML which will save Formatted text as HTML as follow
  • Create XSLT transformation ZPB_TEST_FORMATTED_TEXT using  STRANS T-code and type “XSLT program”. Sample used is as follow:

Please note that ADS can’t identify normal HTML tags. ADS can only identify XHTML tags so we would need to transform the HTML tags into XHTML and that’s why XSLT transformation becomes very handy for these string replacement operation. You can also use regular expression and other ways to transform.

Bold tag in HTML from formatted text in UI          :        <strong> </strong>

Bold tag in XHTML identified by ADS : <b></b>

  • In transaction SFP, create the Adobe form interface ZPB_RICH_TEXT_INTERFACE.
  • For HTML documents, create global data:
  • Create an optional input parameter LS_HEADER which will contain input data from calling program.
  • In code initialization, perform following steps:
    1. Select HTML text from DB table.
    2. Get HTML text for header section and transform using XSLT transformation.
    3. Update transformed text into Global data for header text.

In transaction SFP, create Adobe Form ZPB_RICH_TEXT_FORM and pass the interface above. Import parameters and drag Interface Global data into Form Context. In Form layout, create a text field “txtHeader” in detail view and set it’s property as:

  • Since the text field may include many lines (entried from a UI application), we need surround it in a flowing subform and set its height to “Expand to fit” as seen below:
  • Since field format has been set to “Rich Text“, we need to write java script to bind the XHTML text. Select text field, go to script editor and select “initialize” event :
  • Create a test program to call the adobe form and generate PDFs:

Testing:

If you encounter similar requirements in your project, I hope this post will provide you with a basic understanding of how to address them. I wanted to offer the solution we used in our project, although there may be other options as well.

YOU MAY LIKE THIS

SAP ABAP Checkpoint Group – Chase the Mysterious SAP Issues with a Smile

Best Practices for SAP ABAP Development: A Comprehensive Guide

4 Useful Tips on ABAP and ABAP on HANA

SAP

Adobe Forms. Part 20. XML Integration – An Offline Scenario – 1

In real-time business scenarios, Adobe Forms provide immense flexibility and are highly effective for automating complex business processes. Previously, I demonstrated how to use JavaScript for dynamic layout changes and validations in Adobe Forms, as well as the implementation of Interactive Adobe Forms in different scenarios. Recently, I developed Adobe Forms using an XML schema to enhance functionality, allowing seamless data binding from an XML file while supplying driver data via XML. These forms are widely used when data is provided in XML format and needs to be converted into a PDF.

PDF to XML Conversion:

Functions of Adobe Document Services (ADS)

ADS enables the creation of PDFs and other print-ready documents using XML form templates and existing system data. Additionally, it allows extraction of user-entered data from interactive PDF forms for rendering and further processing.

Interaction with ADS

To simplify integration, SAP provides a single programmatic interface known as the PDF Document Object (or PDF Object). This allows developers to interact with ADS efficiently.

PDF Object in SAP

SAP offers both Java and ABAP versions of the PDF Object. In ABAP, SAP provides two key interfaces:

  • IF_FP (Form Interface): Handles form-related functions.
  • IF_FP_PDF_OBJECT (PDF Object Interface): Manages PDF-related operations.

Business Scenario:

This article uses an offline scenario as its business example, where a client can fill out bank information and submit it back to have it changed in the customer master.

  • The form already has the SAP customer number and invoice number entered.
  • The customer receives the form via email. The client fills out the form and returns it.
  • The client master is updated after the data from the PDF form is obtained.
  • Web Dynpro development, which is utilized for online scenarios for interactive Adobe forms, is not necessary for this.

Process Flow Diagram:

YOU MAY LIKE THIS

SAP ABAP Checkpoint Group – Chase the Mysterious SAP Issues with a Smile

Best Practices for SAP ABAP Development: A Comprehensive Guide

4 Useful Tips on ABAP and ABAP on HANA

SAP

Interactive Adobe. Part IXX. How to Merge an Image File with an Adobe PDF?

Adding a picture (jpg, bmp, etc.) in Adobe format is a common business scenario. We may bind the necessary image using Image Field UI. However, today’s subject is distinct.

How can we merge an image to an existing Adobe PDF form??

However, how can we combine an image in Adobe’s preexisting formats? One of the members of our Telegram group recently inquired about the case’s solution and potential solutions. He needed the photographs saved in PO Generic Object Services (GOS) to be attached and shown with 

the PO Output Form. When two picture files (usually in “.jpg” format) are saved at the Purchase Order, they should be 

combined with the PO Output form and returned to the vendor. To put it briefly, the task was to combine the PDF PO Output Form with the image files in the GOS of the PO.

After some head scratching and cool thinking, the below two steps looked a good start:

Let us dig into the actual technicalities now.

1. Create an Adobe form ZPB_TEST_CONVERT_JPG, Interface ZPB_TEST_CONVERT_JPG with an import parameter as GV_CONTENT of type XSTRING.

2. In context of form, create a Graphics Node as follow:

3. Set the graphics node properties as follow:

4. Create an Image field UI in form layout and bind it with GRAPHICS node created in the context.

We are done with creation of 1st Adobe form in which any image from driver program can be uploaded as PDF and then it needs to be merged with any existing Adobe form.

Next, I have created another Adobe form ZPB_HIDE_TABLE_COLUMN with simple table display. Just create one adobe and hard code some table values. This will act like our 2nd PDF file which we want to merge.

5. Create a driver program with the below steps:

i. Call FP_JOB_OPEN

ii. Generate FM for 1st Adobe form:

iii. Upload an image file from local system.

iv. Convert Binary data into Raw data :

v. Call FM for 1st Adobe Form from step 1 and collect it’s Raw data into an internal table GT_PDF:

vi. Call 2nd Adobe form in which we want to merge the image as PDF and collect it’s Raw data in the internal table GT_PDF:

vii. Now, merge both the PDFs (1st Image, 2nd Adobe Form PDF) into one PDF.

viii. Close the form processing as:

ix. Now, you can generate the result merged PDF (GV_MERGE) from above step vii with the following code:

Testing Time:

Run the driver software. Save the combined PDF to your local computer after selecting an image file from your system (I liked the ELEARNING image):

I hope you are able to bring the solution home. As usual, this is the first and most straightforward approach that comes to mind, but there may be other ways to accomplish the same goal. Please feel free to leave a remark below if you have any other ideas. In this development, we did not do anything new. We just implemented what we have learnt and performed independently in other business requirements. knew how to convert the data to RAW. We knew how to create Adobe Forms. Knew how to get RAW data of the Adobe Forms. knew how to merge PDF files. What we did was just bringing together all this answers to one.

YOU MAY LIKE THIS

SAP ABAP Checkpoint Group – Chase the Mysterious SAP Issues with a Smile

Best Practices for SAP ABAP Development: A Comprehensive Guide

4 Useful Tips on ABAP and ABAP on HANA

SAP Adobe Interactive Part XVII

SAP

SAP Adobe Interactive Part XVII

SAP Adobe Interactive. Part XVIII. How to Hide a Table Column Dynamically Using JavaScript?

We’ve recently been working on a real-world use case for Interactive SAP Adobe Forms. In this post, we demonstrated a real-world project situation in which we used Java Scripts 

to hide/display a table column in a simple, hierarchical 

business model.Essentially, we will show a practical example

 of how to use Java script to conceal or display a certain

 column in an Adobe forms table. It is a frequent demand and there 

are numerous ways to fulfill it, and JavaScript is the 

lucky choice for our project. 

Business requirement:

Table Data Structure is as follow:

Requirement: At runtime,        

  • When Product is “EDITION”, column Territory should be hidden
  • When Product is “RENDITION”, column ISBN should be hidden

The expected result should be as follows:

To further understand, let’s use a basic example rather than the layered table structure described  before.

Create an Adobe form ZPB_HIDE_TABLE_COLUMN with an interface with import parameter as IV_PRODUCT and IT_DETAILS.

  • IV_PRODUCT           :               Product Type entered from driver program
  • IT_DETAILS              :               Detail table with following structure

2. In Adobe Layout, create a table from the data view using IT_DETAILS as follows:

Column Territory should be hidden if the user enters “E” as the product type. So, whenever each body row of the table is populated, we must read the product type IV_PRODUCT, and the corresponding column for the same data row should be hidden.

3. Write a driver application to invoke Adobe form functions, load test data into this table, and then pass the table into an FM that is generated by an Adobe form. The test data might look like this:

4. In the script editor, Write the below Java script code in initialization event of body row of table GT_DETAILS_SIMPLE as follow:

(For details of using scripts in Adobe form, please refer my previous article)

Let’s try to understand the highlighted script code.

Adobe’s XML Form Architecture, or XFA for short, is the foundational component of an XML file used by Adobe PDF. By providing its path as a parameter in the resolveNode method, we can gain access to a particular object in the hierarchy. The reference of the object supplied as an argument would be returned by this method, allowing us to utilize the relevant characteristics of that object.

  • We obtained the IV_PRODUCT context field reference in the highlighted script, and we used the rawValue property to obtain the product type value that the user had supplied in a local variable called product.
  • We attempted to set the visibility attribute (presence) of the corresponding columns to “hidden” based on the product value.

5. Test program creation and result of adobe form print-preview:

a. In the test driver software, create the selection parameter P_PROD that the user will supply to call the Adobe form.

b. Test the program and observe the result:

You can see that the Java script has successfully hidden the column value (Territory as Product type input as E) if you compare the above result with the actual test data from step 3. However, the column header “Territory” has not been deleted. As a result, every column has been moved one spot to the left, creating an incorrect PDF form.

How to correctly display the data?

Another Java script must be written for the table header row’s startup event since we also need to hide the matching column headers from the table header row.

6. In the script editor, Write the below Java script code in initialization event of header row of table GT_DETAILS_SIMPLE as follow:

The current object in which the event has been written will always be referenced. This would be in reference to “data.sbf_details.GT_DETAILS_simple.header” in the highlighted sentence above. Script code is built to set the presence property of territory and isbn texts because we wish to hide a particular field in the header.

  • txt_territory            :               Text field name in header in hierarchy for Territory column
  • txt_isbn                   :               Text field name in header in hierarchy for ISBN column

7. Test the program and observe the form result in “Print-Preview”:

Two important observations if we compare the above result with actual test data in step 3:

  • Since the Territory column is fully hidden and the product entered is “E,
  • ” we have met the criterion. Nevertheless, there has been a disturbance in the column width. The NET_UNITS field was not set as large as it seems in the following example. The ISBN column width has taken its place, and this also applies to any further columns that follow.

What would be the exact solution now?

We noticed that in addition to concealing a column field and header, we also need to dynamically modify the column width. This can be accomplished by writing Java Script code in one location, which will handle everything at once, as opposed to creating numerous Java Scripts on multiple objects (BodyRow, HeaderRow, Table Column Width changes).

8. After step 3, Follow this step and write the below Java script code in initialization event of table GT_DETAILS_SIMPLE as follow:

Explanation of above Script code is as follow:

  • var width = this.columnWidths   – Return the whole string as set of all column’s width
  • var array = width.split(” “)            – Split the width string by space, return an array with each column
  • array[2] = ‘”0.001mm”                    – Replace third column width with 0.001mm.
  • array.join(” “)                                    – Concatenate all the array data sets and return a string.

9. Test program creation and result of adobe form print-preview same as step 5 above:

  • Now that the product entered is “E,” the Territory column is suppressed and all column widths are shown correctly.
  • However, the height of the column header is now automatically changed A “Text” UI’s layout properties cannot be changed dynamically, thus we must change its type to “Text Field” and double-check the outcomes.

10. Change the type of the Header columns to “Text Field” as follow:

a. Select column header and go to Object palattes:

b. Set the default column header text as follow:

c. Follow the above steps for all column headers.

11. Repeat step 9 and check the result in print-preview:

a. When Product = E

b. When Product = R

Conclusion:

Using Java Script code, we have now seen numerous methods for hiding or displaying a certain column in Table UI in Adobe forms. The most effective and straightforward method is to use Table’s Property 

column Width. The aforementioned straightforward table use case allows us to apply the same guidelines to intricate corporate settings.

We will now learn how to handle a nested Table columns controlled by Java Script.

12. a. Extend the above Adobe form with new context created in form interface:

IT_NESTED  :   Detailed Product structure with Table type as follow:

b. Create a table from data view using IT_NESTED in Adobe layout as follow:

c. Set the PRODUCT_TYPE column in table IT_NESTED as invisible        

We must now read the Product field for each DATA record in IT_NESTED and modify the columnWidth property of the DETAILS Table in order to conceal or display the matching columns in the details table.

13. Write the below Java script code in initialization event of table DETAILS as follow:

14. Check the result in print-preview:

As you can see, we can quickly accomplish complex business scenarios with just one Java Script code block. That is Adobe Forms’ Java Script’s strength. These days, SAP Adobe makes extensive use of JavaScript. JavaScript is crucial to SAPUI5. It’s imperative that ABAP engineers understand JavaScript for their career advancement. `

YOU MAY BE INTERESTED IN

Is SAP ABAP a High Paying Job?

IDoc to EDI Mapping: Bridging the Gap

Your Definitive Guide to Becoming a SAP ABAP Developer

SAP

Interactive Adobe. Part XVII. How to Execute URL Dynamically by Button Click Event?

Interactive Adobe. Part XVII. How to Execute URL Dynamically by Button Click Event?

Numerous multiple times, we have a business prerequisites where we might want to have editable structure or fastens/check encloses the adobe structure which client can click and wanted activity ought to be executed. Now and then we additionally might want to communicate with SAP utilizing activities performed by intuitive structures.

These sorts of business prerequisites can be satisfied utilizing IFBA (SAP Intelligent Structures By Adobe). Or on the other hand essentially Intelligent Structure By Adobe.

IFBA can be used in 2 scenarios:

  • Offline
  • Online

Online situations are significantly utilized in Web Dynpro Applications where IFBA can be coordinated as UI component of web dynpro part.

Offiline situations can be perceived as IFBA utilizing email connection shipped off a client, client opens the pdf connection, top off the information in the structure and submit it.

Prerequisites:

Most significant essential is to empower intelligent highlights on Promotions. Naturally, printed Adobe structures can be made and worked upon however for IFBA, Adobe peruser privileges certifications ought to be arranged on Promotions. These peruser privileges would be given in “.pfx” record by SAP itself. Kindly go through the accompanying SAP Notes and solicitation your Premise group for this setup:

How to test configuration of SAP ADS?

You can always check if Adobe reader rights credentials are configured correctly by executing a test report provided by SAP: FP_TEST_IA_01.

  1. In the event that adobe structure shows in the wake of executing above report, you can alter the structure and save then your SAP Adobe Advertisements design is turned out totally great.
  1. Information on making Adobe shapes and prearranging.
  2. Fundamental information on ABAP.

Business requirement:

In Receipt Structure, a button for installment connect page ought to be accessible so clients with substantial email locations can get the receipt on their letter drop and can pay the due sum utilizing that button.

Solution:

We will make a basic Adobe Structure with some text fields and a button. In structure interface, we will make an import boundary IV_URL. From driver program, we can give the URL data and utilizing JavaScript, we can peruse this URL in Structure and predicament to Fasten click activity.

Step 1 – Create an Adobe Form and the corresponding Interface

Create an Adobe form ZPB_DISPLAY_DYNAMIC_URL and interface with import parameter IV_URL as follow:

Step 2 – Design your form as per the requirement

For our case, we are making a straightforward text for guidelines and a button for installment as observe:

Now, we need to provide the URL which should be executed as soon as payment button is clicked.

In the event that we have a static URL (for example organization site), we don’t have to pass it from driver program/structure interface. We can straightforwardly deal with it in the Adobe Structure itself. Simply change the “Control Type” quality of Button object to “Submit” and give the URL there.

Step 3 – Choose the Button Control Type as Submit

Select button “btn_payment” from Hierarchy. Go to toolbar, select Palettes and select Object -> Control Type -> Submit.

Step 4 – Assign the URL to Button

Select “Submit” tab in Object palates and provide the static URL:

Step 5 – Test the Button with URL Hyperlink

To test the usefulness, go to “Review PDF” and click on Installment Button:

You can see the result as below:

That is very simple with next to no ABAP code and Java Content code. In any case, life isn’t that simple in genuine undertakings. Recall our business prerequisite?

We need to pass this URL powerfully from driver program. URL for each and every other client would be unique and not entirely set in stone at run-time. All in all, the installment connect URL would be produced distinctively for each request. So it’s a precarious part and indeed, Java Contents can assist us with accomplishing it.

Step 6 – Go to Script Editor of Adobe

Select button and go to script editor (I think with my previous blog, you must know how to access script editor in Adobe forms. If not, please refer that for better understanding about scripting in Adobe forms )

Step 7 – Write JavaScripts code on Click Event

We have to write our script on “Click” event of button. Select “Click” event from available events drop down:

Did you notice? “Click” event is disabled and can’t be selected for this payment button.

Reason: Since we chose Control Kind of button as “Submit”, framework would expect the activity statically and that is the reason “click” occasion is crippled.

To empower it, we want to change the Control Kind of button as “Customary”.

Step 8 – Change the Button Control Type to Regular

Go to object palates of payment button and select control type “Regular”.

Repeat step 7 and try to select “edit” event, it will be available this time.

Step 9 – Insert the JavaScript code

Select “click” event for button “btn_payment”, language as formcalc  and run at client.

Write the below JavaScript code in script editor:

var valueUrl = xfa.resolveNode("$record.IV_URL").value;
xfa.host.gotoURL(valueUrl);

We are done with Form development. Now, another tricky part is passing control parameters for interactive forms.

Step 10 – Call Adobe Form from Driver Program

Make a driver program and call all the Structure handling FMs with required control boundaries and create the result.

Assuming you see intently, there is NO interactive feature enabled on button and it wouldn’t permit tapping on button. What might be the issue then? We previously checked Promotions arrangement in essentials area and its turned out great.

Reason:

There is a banner in structure boundaries structure SFPDOCPARAMS called Usable.

As a matter of course it’s clear so adobe structures are shown as a print structure naturally.

On the off chance that we believe that structure should have intelligent highlights, this banner ought to be set.

Step 11 – Set the FILLABLE Form Parameter to ‘X’

Set the form parameter before calling Form Function Module as follow :

Step 12 – Re-test the driver program

Now execute the driver program again and check the output.

If you check the highlighted section on button, you can see a cursor and button is enabled to be clicked. Here we go and get the access to URL which was passed from driver program:

This is an actual real project development. I have used this option in my project where we are sending invoices with due amount to our digital customers. For each invoice, payment landing page URL is generated dynamically so that when customers will click on payment button, they just need to enter their Credit Card details and payment will be captured against that invoice.

A sample of the invoice with payment button sent to customers is as follow:

In my next blog, I will share a business situation in intuitive Adobe structures where end clients can top off subtleties in an editable structure and submit it to Drain information base tables. All in all, you are playing out a Muck activity in SAP from an Adobe Structure. Along these lines, kindly stay tuned.

YOU MAY LIKE THIS

SAP ABAP Checkpoint Group – Chase the Mysterious SAP Issues with a Smile

Best Practices for SAP ABAP Development: A Comprehensive Guide

4 Useful Tips on ABAP and ABAP on HANA

SAP

SAP Adobe Form Tutorial. Part XVI.

SAP Adobe Form Tutorial. Part XVI. Practical Use Case of FormCalc and JavaScript

In this article, we would exhibit the utilization of Aggregate in FormCalc and afterward progressively change text style involving JavaScript in SAP Adobe structures

The fundamental benefit of utilizing prearranging is that we can further develop usefulness and can oversee structures at runtime powerfully.

SAP Adobe form supports 2 scripting languages:

  • FormCalc
  • JavaScript


Both prearranging dialects are having advantages and hindrances, so we can conclude in view of our necessities which prearranging language to be utilized. In this blog, we will give not many normal business situations from both the prearranged dialects.

If it’s not too much trouble, note that we have previously distributed an article on the utilization of JavaScript in Adobe Structure. You might allude to it for greater lucidity.

Additionally Read: Powerfully Stow away and Show Fields involving Javascript in Adobe Structure In view of Conditions

Requirements:

Fundamental information on SAP Adobe structure with Tables
Essential comprehension of JavaScript and FormCalc capabilities
ABAP programming abilities
Business Requirements:

  1. In the definite explanation shipped off clients, we might want to show aggregate sum and absolute units as subtotal at the end of all details.
  2. In the depiction segment of an assertion, we might want to show header results of the order as striking and in various style so that recognizing the header item in the entire statement is simple. Solution:
    We would have to make an Adobe structure and point of interaction with worldwide information. We will add some test information in these worldwide information interior tables in interface “code instatement” and later tie these worldwide interior tables with UI tables in Adobe Structure format.

P.S. We could likewise accomplish this by composing handling rationale in the driver program and passing the necessary interior table as import boundaries of the Adobe structure. Since this blog is more on utilization of contents, we have not considered the best methodology for information handling.

Step-by-step process

  • Make a structure interface ZPB_TEST_SCRIPTS utilizing T-Code SFP
  • Make Worldwide Information for Subtleties and depictions inside table
  • Structure for Depiction
  • Structure for Subtleties
  • Go to code instatement and fill test information in inner tables as follows:
  • Drag Worldwide information of connection point from passed on side board to Setting of structure in right side board
  • Presently Go to Design of Adobe structure and make table utilizing these setting information planned with Worldwide factors in interface. Kindly follow the underneath steps :

a. Go to Information View Ranges from toolbar

b. Select GT_DETAILS table as featured and drop on Detail page of structure design

c. You would see a table made and naturally binded with GT_DETAILS.

d. Make a footer column for “Subtotal.”. For that, go to Order Ranges, Grow GT_DETAILS Table, and make another column after Information. Go to Protest Ranges for the new column ( DATA[1] )and change the line type to “Footer.”.

Kindly note that assuming we will make a table component utilizing a table collaborator , a footer will be made accordingly. Since I went through information view ranges, I needed to physically make a footer.

Presently, we will do the intriguing step. Compose Formcalc Content to ascertain aggregate for all details.

  • Select text field in footer under NET_UNITS and go to arrange supervisor
  • Presently, go to the Show Occasions drop-down, and you will find all occasions are turned grayed out. WHY?
  • This is on the grounds that for few UI fields, prearranging isn’t permitted, and that is the reason every one of the occasions are in show mode as it were. To empower the occasions and compose the content rationale, we really want to change the kind of UI component from “text” to “text field.”.


Check the beneath picture. At the point when the Sort is Text, the Show occasions are turned grayed out.

At the point when we transformed it to Text Field, every one of the occasions got empowered.

  • Change the UI type for NET UNITS and Absolute Eminences fields in Footer line as “Text Field”

You can see that for featured fields above, line variety has been changed to red, and for different fields, it stayed blue. It is a marker to recognize text UI or textField UI.

Presently, rehash stages 8 and 9 for choosing a suitable occasion to compose a prearranged rationale.

Do you recall our business necessity? We might want to compute the amount of all the details and show it in the footer line as a subtotal.

  • Select Ascertain occasion from the all occasions dropdown , lang. as Formcalc, and compose the underneath code :
  • Presently, make a test pilot program to produce the outcome pdf ( if it’s not too much trouble, allude the past web journals to make a driver program for testing Adobe structures ) and create a pdf with subtotal :

By utilizing only a solitary Total capability and with next to no ABAP rationale, we can compute the all out of details in a table in Adobe structures and print likewise utilizing FormCalc prearranging.

There are additionally different capabilities accessible in FormCalc like Normal, Rate and so on

Time to mess with some JS (JavaScript) coding in script manager

  • Kindly recurrent stage 7 from a-c and make one more table for portrayal utilizing setting table GT_DESCRIPTION from information view.

Recollect another business necessity? We really want to set header Item in the portrayal field as Striking and with various text style and things as italic in view of Strong/ITALIC settings at runtime.

  • Select Information line of GT_DESCRIPTION table from Order and go to prearrange manager.
  • Select “structure : prepared” occasion , language as “javascript,” and compose the underneath code :
  • Run the driver program made in sync 12 and actually take a look at the outcomes:

For text to be changed in italic in view of the italic banner, rehash ventures from stage 15 :

  1. Select “structure : prepared” occasion , language as “javascript,” and compose the below code :

Result from Driver Program:

Result

This article was to give genuine case models that engineers can imitate in their SAP scene. Subsequent to going this instructional exercise, anybody can evaluate in their own framework and utilize Java scripts and FormCalc prearranging dialects in Adobe structures. In the event that you actually face an issue, kindly go ahead and compose your inquiries in the remarks segment underneath or reach us straightforwardly at

Assuming you think our page is useful, remember to impart our connections to your companions, partners and colleagues. Do like our facebook page and follow us at twitter and instagram. Kindly buy into our youtube feed with the expectation of complimentary start to finish video courses.

YOU MAY LIKE THIS

SAP ABAP Checkpoint Group – Chase the Mysterious SAP Issues with a Smile

Best Practices for SAP ABAP Development: A Comprehensive Guide

4 Useful Tips on ABAP and ABAP on HANA

SAP Adobe Form Tutorial Part XV Different Background Color for Label and Content Text

× How can I help you?